

Setting up a Kali Linux for wireless pen-testing and at-home labs can be quite frustrating when you have to account for different wireless adapters, the setup process for them, and how the chipset synergizes with the VM guest OS.
Wireless Adapters!!!
Problems With Built-in Wireless Cards
In “Network hacking,” most people get confused when talking about Network adapters and Network cards.
Most don’t know what they are, why we need them, and how to select the best adapter since we have so many brands and models available in the market.
A wireless adapter is a device that you connect to your computer via the USB port, and it allows you to connect to WiFi networks and communicate with other devices on the network.
However, you might wonder: “Why would I need a USB network adapter since my laptop already has an inbuilt adapter that enables me to connect to wireless networks?”
There are two main problems with built-in WiFi adapters.
- They can’t be used in Virtual machines – Kali inside a VM does not see the built-in WiFi card of your laptop as a WiFi adapter but will see it as an ethernet adapter. Hence you can have full internet access, but you cannot do packet injection or place the WiFi card into monitor mode.
- Most built-in cards are not suitable for hacking – In wireless hacking, there are two main factors that we look out for in adapters. That is ‘packet inhection’ and support for ‘monitor mode.’ Unfortunately, most of the built-in adapters support non of these two features.
Buy a Kali Linux Compatible Wi-Fi Adapter
Compatible Chipsets for Kali Linux
For the longest time, the gold standard for WiFi Adapter for Kali Linux chipsets was Realtek, Ralink, and Atheros. In recent months and years, ALFA has started working with MediaTek, which manufactures the MT76XXU chipset lineup which is fully supported by Kali Linux, so there is a new player in the game for Kali Wireless Adapter.
Some of the supported chipsets that qualify as WiFi adapter for Kali Linux are:
- Realtek RTL8812AU
- Realtek 8187L
- Ralink RT5370N
- Ralink RT3572
- Ralink RT5572
- Ralink RT3070
- Ralink RT307
- Atheros AR9271
- MT7610U
- MT7612U
UNSUPPORTED CHIPSETS - looking for more support - has a workaround
- Realtek RTL8814AU
- used to be - no current support as of 9/4/2022
- YOU CAN STILL GET IT WORKING, but it takes A LOT more work and digging
Compatible Adapters
Best Kali Linux Pen Testing USB Adapters
Best Kali Linux Compatible USB Adapters
- Alfa AWUS036NHA
- TP-Link TL-WN722N (Version 1 Only)
- Alfa AWUS036NH
- Alfa AWUS036ACH
- Panda PAU09
- Panda PAU05
- Alfa AWUS036NEH
- Alfa AWUS051NH
- Alfa AWUS036ACHM
| Adapter Name | Chipset | Support Tags | Frequency | Protocol | Where to buy |
|---|---|---|---|---|---|
| ALFA AWUS036NEH | Ralink RT3070 | SUPPORTED - 2022 KALI | 2.4GHz | 802.11N | Amazon |
| TP-Link TL-WN722N (V1) | Atheros AR9271 | SUPPORTED - 2022 KALI | 2.4GHz | 802.11N | Amazon (DYOR)) |
| ALFA AWUS036NH | Ralink RT3070 | SUPPORTED - 2022 KALI | 2.4GHz | 802.11N | Amazon (Sometimes) |
| ALFA-AWUS036NHA | Atheros AR9271 | SUPPORTED - 2022 KALI | 2.4GHz | 802.11N | Amazon |
| Panda-PAU09 | Ralink RT5572 | SUPPORTED - 2022 KALI | 2.4GHz | 802.11N | Amazon |
| ALFA-AWUS036ACH | Realtek RTL8812AU | SUPPORTED - 2022 KALI | 2.4GHz / 5GHz | 802.11AC | Amazon |
| ALFA-AWUS036H | Realtek 8187L | SUPPORTED - 2022 KALI | 2.4GHz | 802.11b/g | Amazon |
| ALFA-AWUS036ACHM | MT7610U | SUPPORTED - 2022 KALI | 2.4GHz / 5GHz | 802.11AC | Amazon |
| ALFA-AWUS036ACM | MT7612U | SUPPORTED - 2022 KALI | 2.4GHz / 5GHz | 802.11ac/a/b/g/n | Amazon |
| ALFA-AWUS1900 | Realtek RTL8814AU | WORKAROUND - 2022 KALI | 2.4GHz / 5GHz | 802.11ac/a/b/g/n | Amazon |
| ALFA-AWUS036AC | Realtek RTL8812AU | SUPPORTED - 2022 KALI | 2.4GHz / 5GHz | 802.11ac/a/b/g/n | Amazon |
| ALFA-AWUS036ACS | Realtek RTL8811AU | ???? | 2.4GHz / 5GHz | 802.11ac/a/b/g/n | Amazon |
| ALFA-AWUS036EAC | Realtek RTL8812AU | SUPPORTED - 2022 KALI | 2.4GHz / 5GHz | 802.11ac/a/b/g/n | Amazon (Sometimes) |
| ALFA AWPCIE-1900U | Realtek RTL8814AU | WORKAROUND - 2022 KALI | 2.4GHz / 5GHz | 802.11ac/a/b/g/n | Amazon (Sometimes) |
Install VirtualBox
https://www.virtualbox.org/wiki/Downloads
Installing Oracle VM VirtualBox and Extension Packs
Oracle VM VirtualBox comes in many different packages, and installation depends on your host OS. If you have installed software before, installation should be straightforward. On each host platform, Oracle VM VirtualBox uses the installation method that is most common and easy to use. If you run into trouble or have special requirements, see Chapter 2, Installation Details for details about the various installation methods.
Oracle VM VirtualBox is split into the following components:
-
Base package. The base package consists of all open source components and is licensed under the GNU General Public License V2.
-
Extension packs. Additional extension packs can be downloaded which extend the functionality of the Oracle VM VirtualBox base package. Currently, Oracle provides a single extension pack, available from: http://www.virtualbox.org. The extension pack provides the following added functionality:
- The virtual USB 2.0 (EHCI) device. See Section 3.11.1, “USB Settings”.
- The virtual USB 3.0 (xHCI) device. See Section 3.11.1, “USB Settings”.
- VirtualBox Remote Desktop Protocol (VRDP) support. See Section 7.1, “Remote Display (VRDP Support)”.
- Host webcam passthrough. See Section 9.5, “Webcam Passthrough”.
- Intel PXE boot ROM.
- Disk image encryption with AES algorithm. See Section 9.28, “Encryption of Disk Images”.
- Cloud integration features. See Section 1.14, “Importing and Exporting Virtual Machines”.
Oracle VM VirtualBox extension packages have a
.vbox-extpackfile name extension. To install an extension, simply double-click on the package file and a Network Operations Manager window is shown to guide you through the required steps.To view the extension packs that are currently installed, start the VirtualBox Manager, as shown in Section 1.6, “Starting Oracle VM VirtualBox”. From the File menu, select Preferences. In the window that displays, go to the Extensions category. This shows you the extensions which are currently installed, and enables you to remove a package or add a new package.
Alternatively, you can use the VBoxManage command line. See Section 8.41, “VBoxManage extpack”.
Getting Kali Linux Onto VirtualBox
Import Pre-Made Kali VirtualBox VM
Importing the Kali VirtualBox image is very easy.
We first need to extract the VirtualBox image:
kali@kali:~$ 7z x kali-linux-2022.3-virtualbox-amd64.7z
[...]
kali@kali:~$
If we are using Windows we can instead use the official 7z app.
We then launch VirtualBox:
From here we will be wanting to select ‘Add’. We then navigate to the location our VM is downloaded and find the .vbox file:
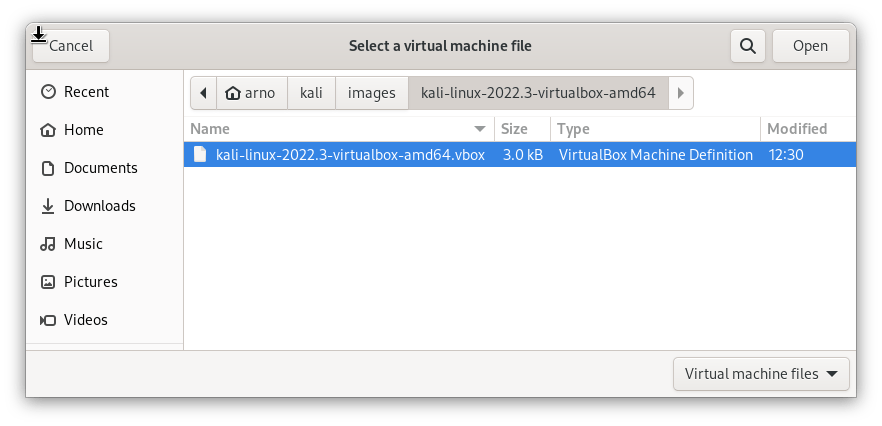
We select this then we are able to continue forward:
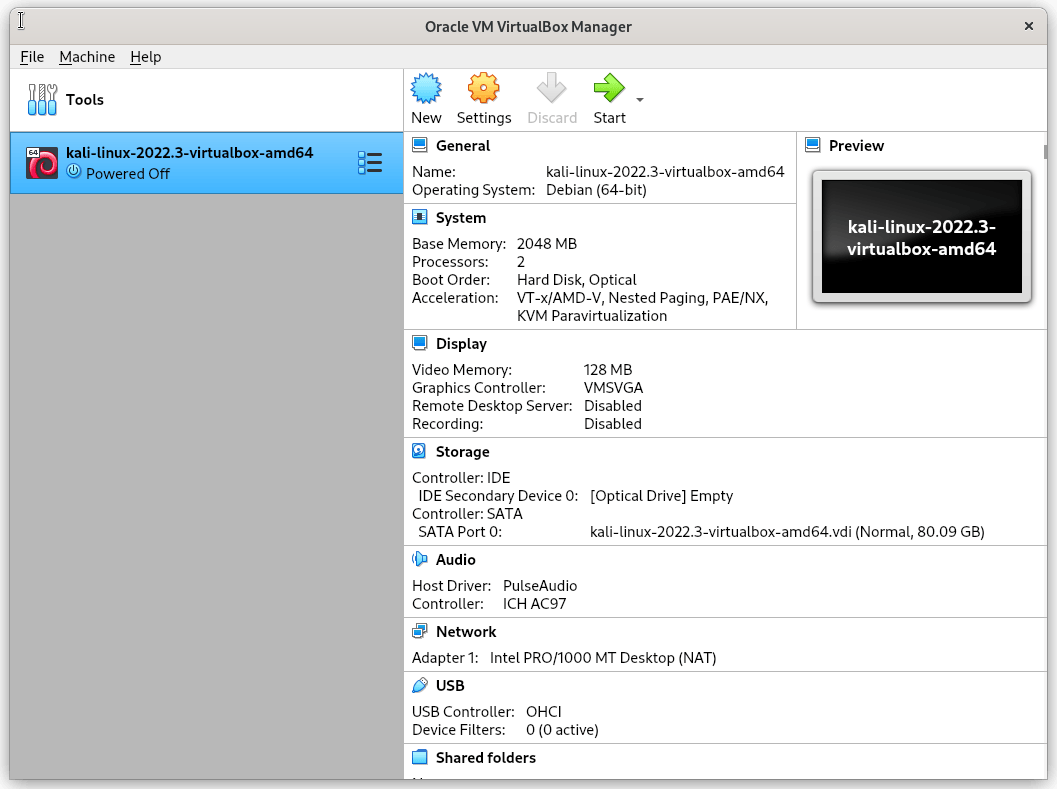
We can verify the settings that will be set here, and if we need to change any we can. Once we are happy we can select boot the VM and use it as normal. Remember the default login is kali for the user and kali for the password!
Generate and Install Kali Linux on VirtualBox (not pre-made)
Virtualization
This guide is about virtualizing Kali Linux inside of VirtualBox, allowing you to have a Kali VM. This is a great way to use Kali, as it is completely separate from the host, allows you to interact with other VMs (as well as the host machine and other machines on the network), and allows you to revert to snapshots.
You may wish to follow our other guide if you are trying to install VirtualBox on Kali Linux (as a host).
The guide below is what we use to generate our pre-made Kali Linux VirtualBox images. You may alter this to your needs. We always generate the images using the latest version of VirtualBox.
Wizard
](https://www.kali.org/docs/virtualization/install-virtualbox-guest-vm/#wizard)
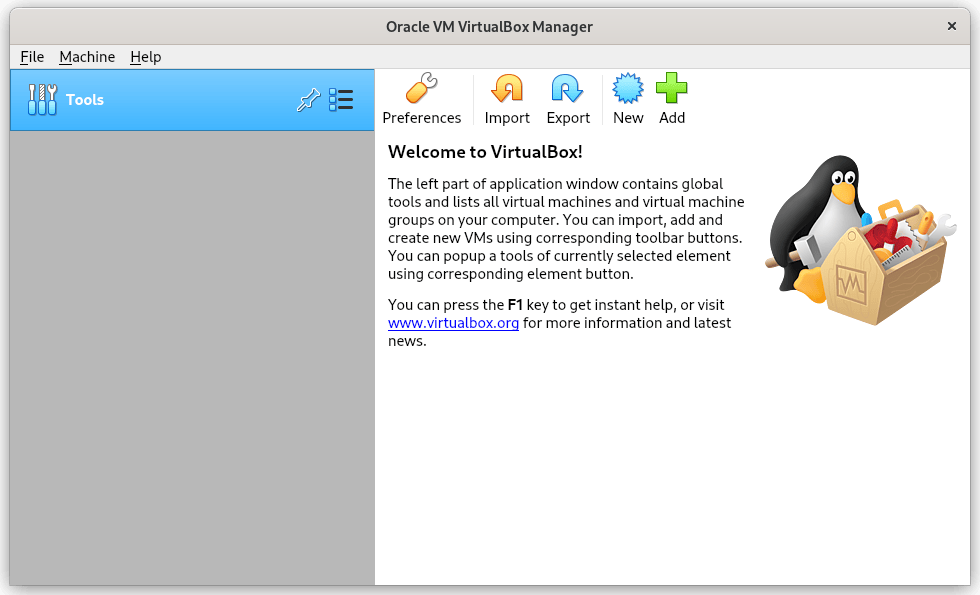
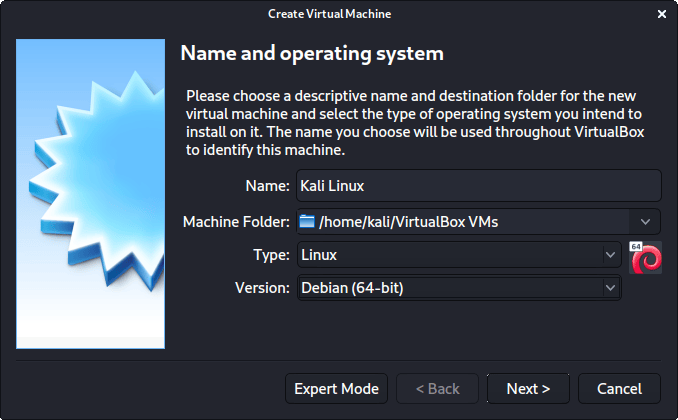
Upon starting up VirtualBox, select “New” (Machine -> New).
The next screen is “Name and operating system” which is where you name the VM. This name is also used in any filenames (such as the configuration, hard disk and snapshot - which isn’t changed from this point).
We are keeping it generic in this guide (as Kali is a rolling distribution, and we update it), however for our releases, we use the version number in the name as it is a fixed release (kali-linux-YYYY.N-vbox-ARCH. Example: kali-linux-2022.3-vbox-amd64).
For the “Type”, we set it as Linux. For the “Version”, we are going to be using the x64 desktop image, so we are going to select Debian (64-bit).
“Memory size” is the next section, where we can define how much RAM to use. Again, the higher the amount of RAM, the more applications can be open and at increased performance. Various tools inside of Kali can be demanding of resources. When we make the general VMs, we select 2048 MB (2GB) for RAM, but we often increase this for our personal machines as we have high-performing devices with spare RAM which Kali can utilize.

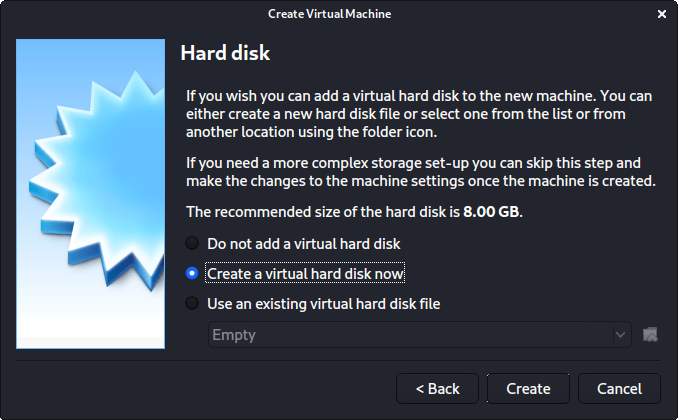
This screen below, “Hard disk”, allows us to Create a new virtual disk now.
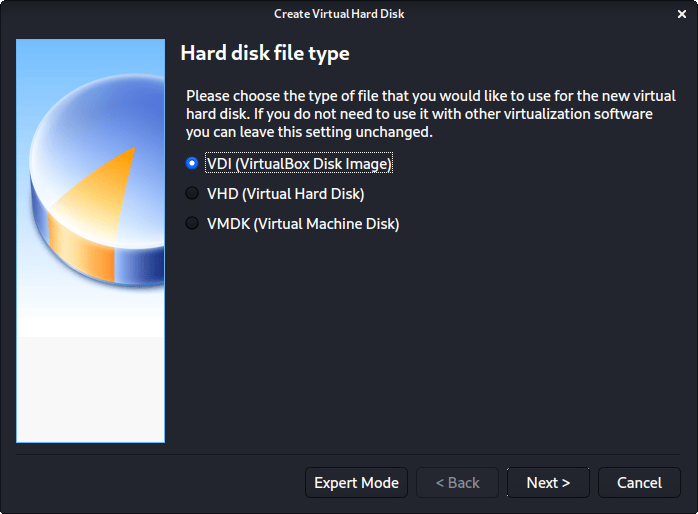
For the “Hard disk file type”, we select VDI (VirtualBox Disk Image) (and its the default option).
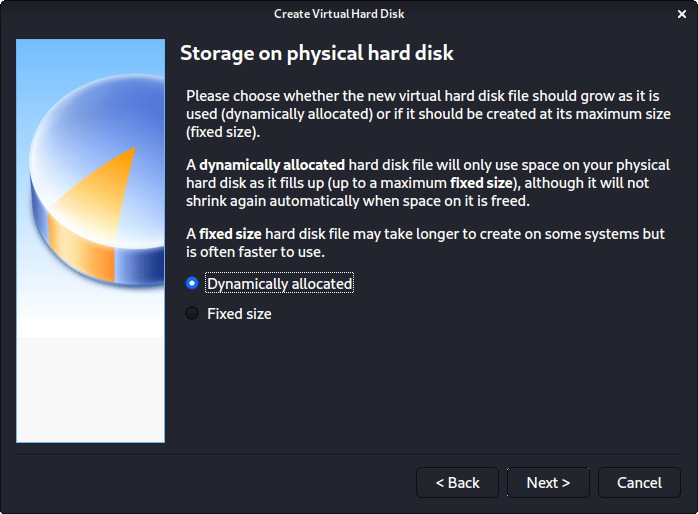
For the following screen, “Storage on physical hard disk”, we go with the default option of Dynamically allocated.
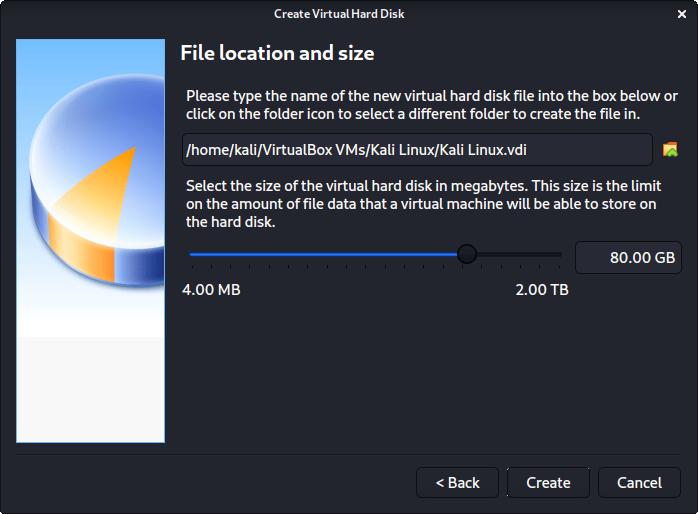
Now with “File location and size”, we can now define how large the virtual hard disk will be. We use 80.00 GB for our VMs.
After clicking on “Create”, the wizard is complete.
Now we click on “Settings”, to customize the VM further.
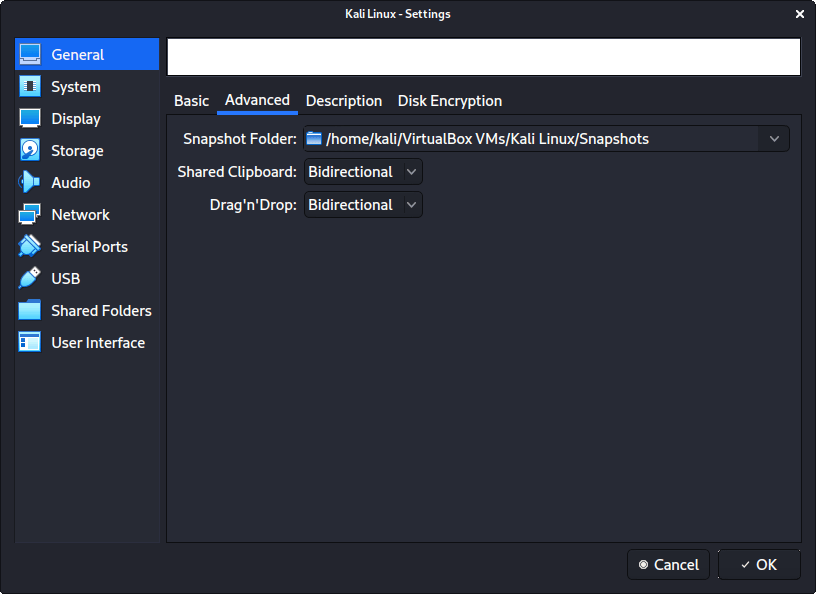
In “General” -> “Advanced”, we make sure to set “Shared Clipboard” to bidirectional, as well as “Drag’n’Drop” to bidirectional
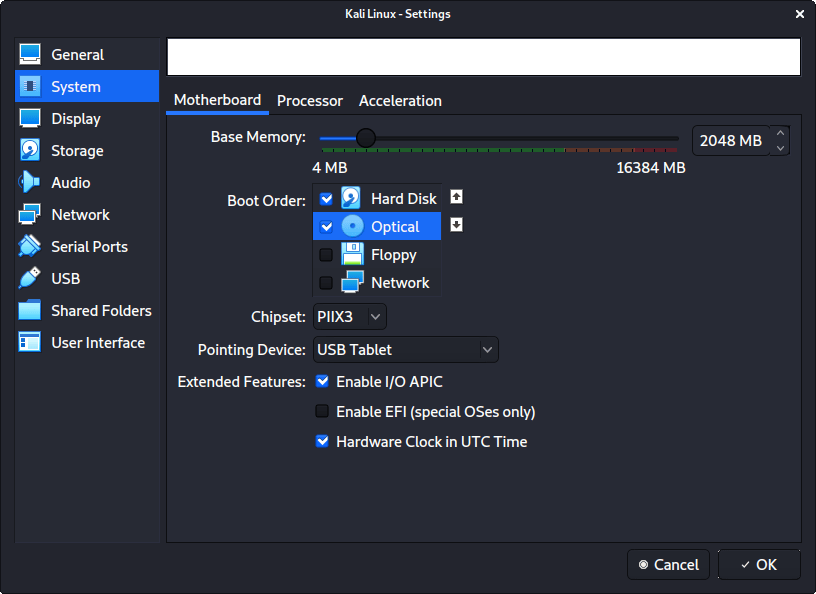
In “System” -> “Motherboard”, we change the “Boot Order” to make sure Hard Disk is top and Optical is the second. Everything else is disabled.
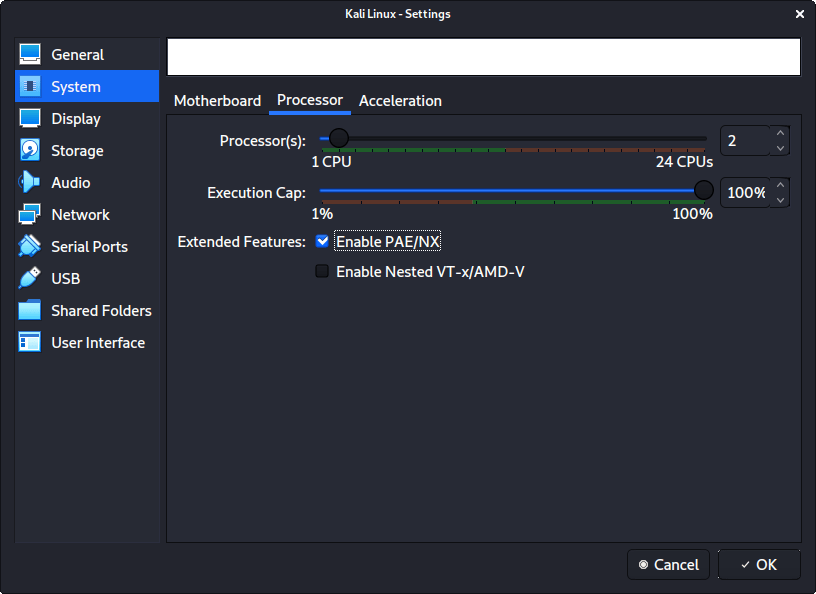
In “System” -> “Processor”, we increase the “Processor(s)” to be 2.
At the same time, we also enable “Extended Features” for Enable PAE/NX.
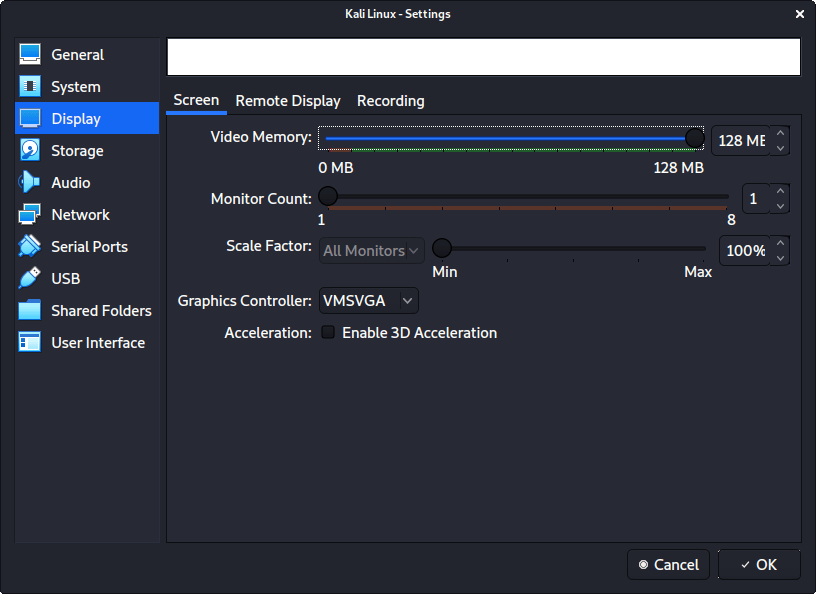
In “Display” -> “Screen”, we make sure to have “Video Memory” set to 128 MB
Another item to point out is to make sure that “Accelerated 3D graphics” is disabled, as people have reported that causes issues.
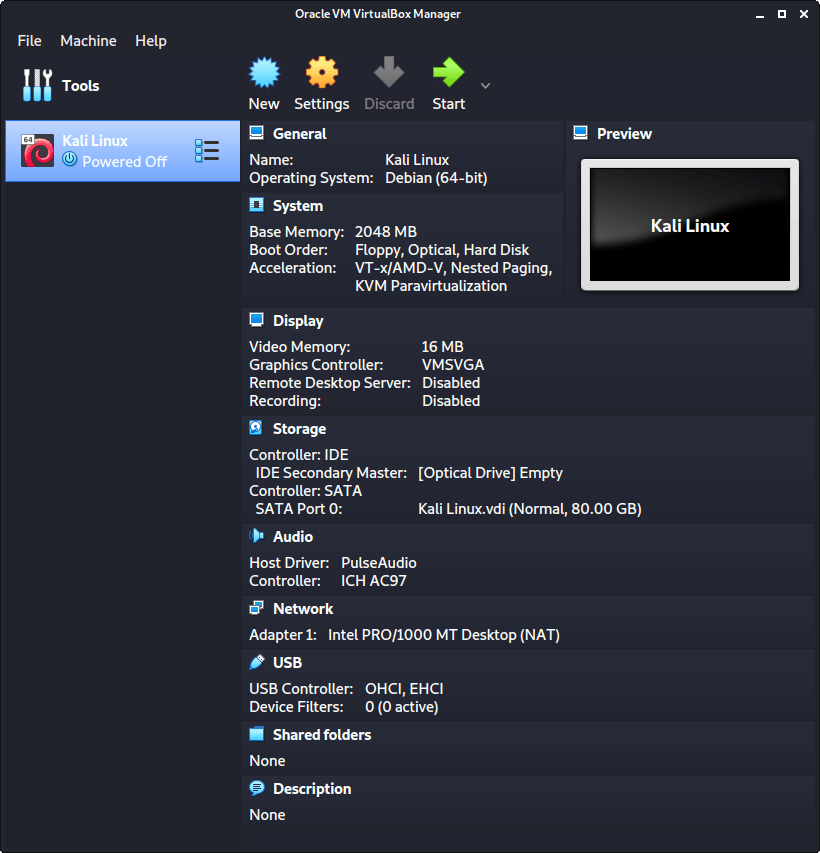
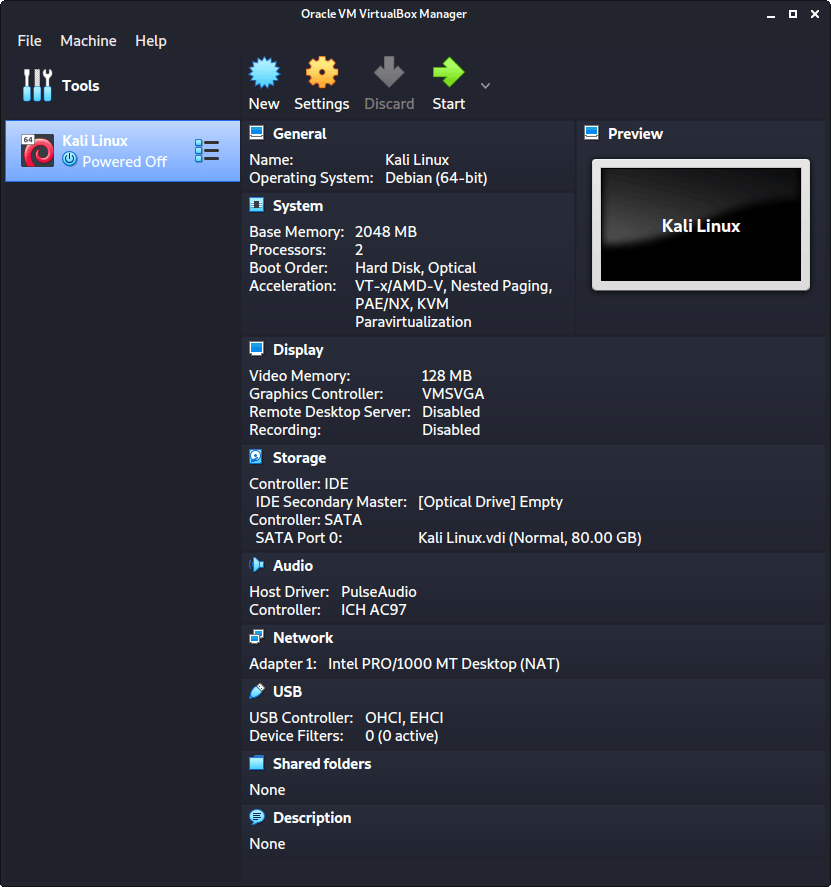
The final settings view looks like the following:
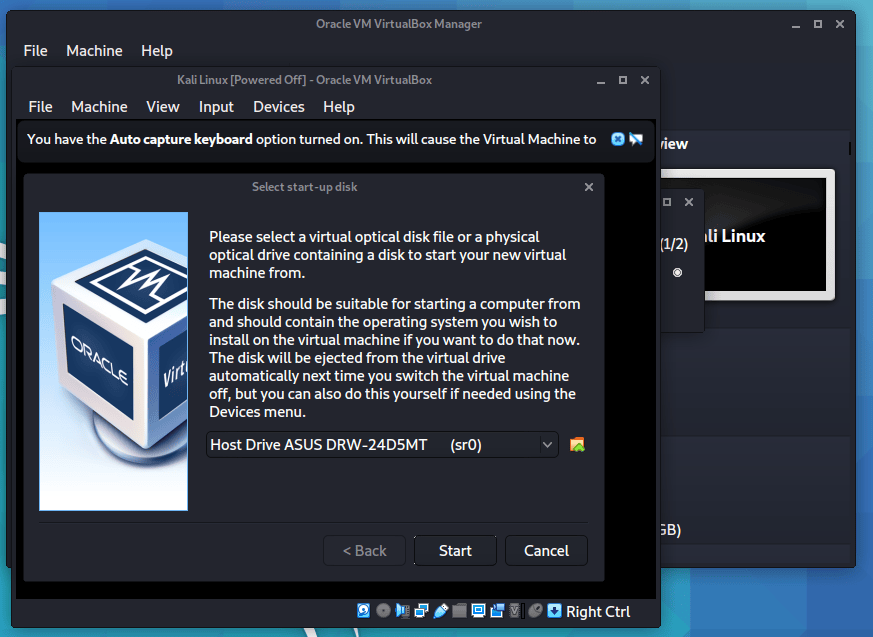
When we are ready to go, press “Start”.
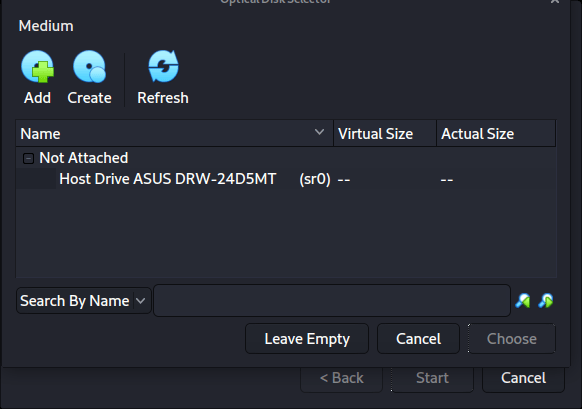
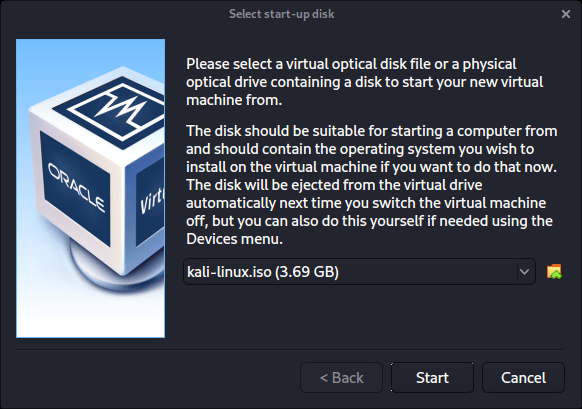
The first time we run it, we will get a prompt saying do we wish to mount an image to use as a “start-up disk”. We want to use our Kali image, rather than a physical drive, so we select the icon to the side of the drop down.
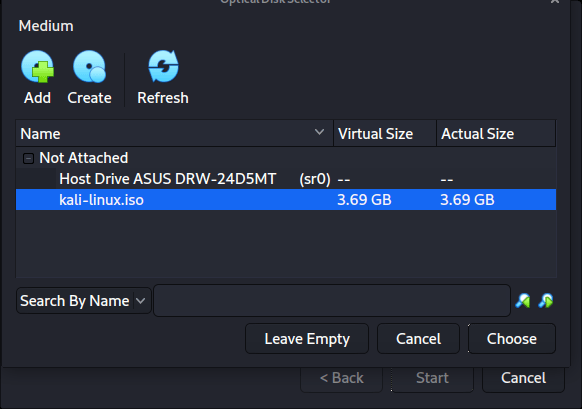
A new pop up will open, “Optical Disk Selector”. We will now press “Add”, then navigate to where our ISO is located.
After pressing “Open”, we can see its been added, so we make sure its selected and press “Choose”.
All that is left now to do is press “Start”.
After all this is done, we save, start up the VM, and then continue installing Kali Linux as we normally would for a bare metal install.
During Kali Linux setup process, the install wizard should detect if its inside a VM. If it is, should then automatically install any additional tools (such as virtualbox-guest-x11) to give a better user experience. If you want to manually re-install it, you can see our VirtualBox Guest Guide.
Configuring VirtualBox Kali Linux VM for Wireless Monitoring and Injection
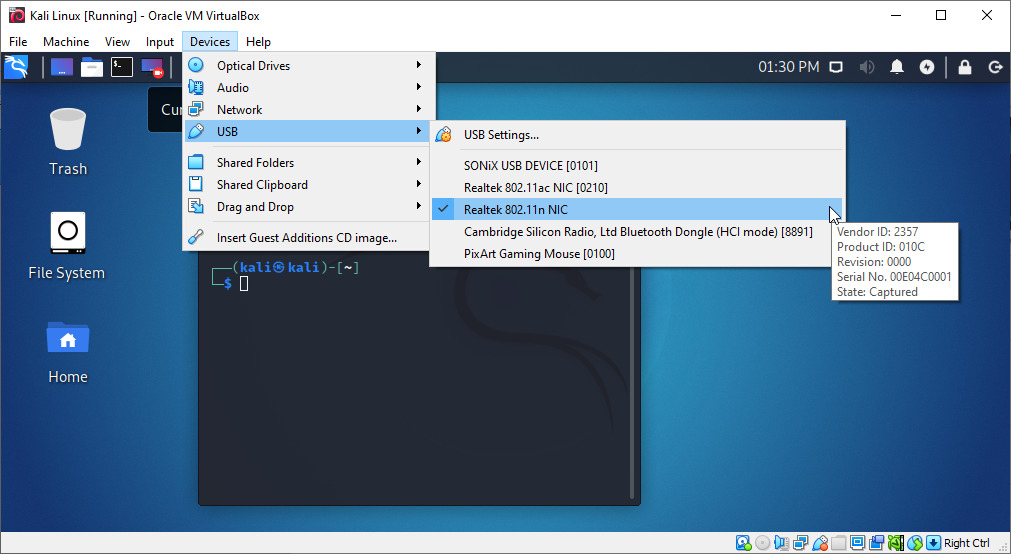
Automatically Connect the Wi-Fi Adapter to a VirtualBox VM
You can also automatically connect a wireless adapter to your Kali Linux virtual machine, when running VirtualBox. This way, you don’t have to manually connect it every time
To do this follow the steps below:
-
Shutdown the Kali virtual machine if it was already running
-
Connect your Wireless USB adapter to your PC
-
Right-click on your Kali Virtual machine and select the Settings option. A window will open displaying all the different configuration options.
-
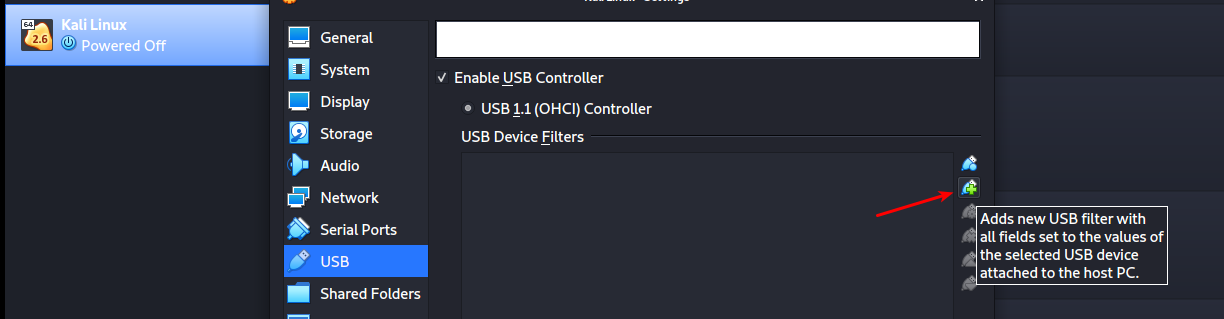
Click on the USB option and check the Enable USB controller check box.
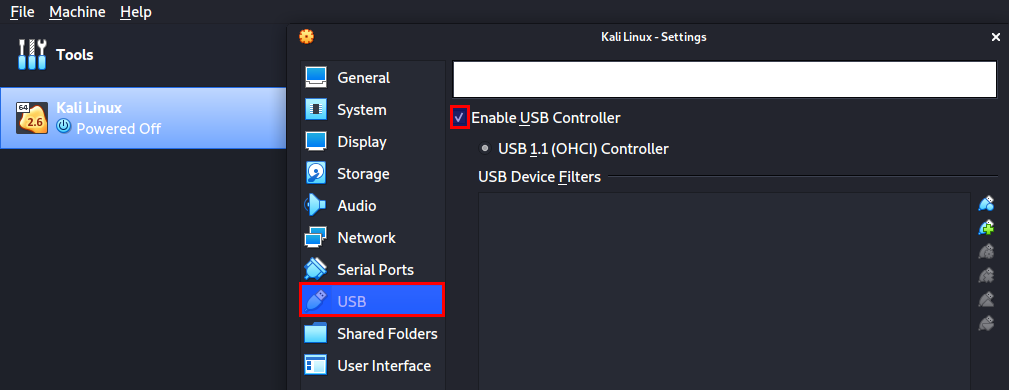
We will need to add a USB filter on this window that will enable us to mount our wireless adapter to the Kali VirtualBox VM.
-
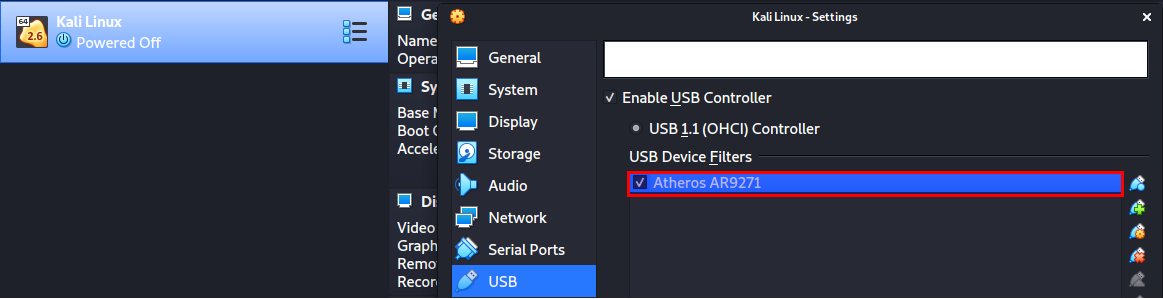
Click on the USB icon that has a plus (+) sign and select your Wireless adapter.Note: Be careful since the adapter may appear with the chipset na,e instead of the Brand name. For example, my adapter in this case is TP-LINK TL-WN722N 2.4GHz v1 but was listed under the chipset name Atheros AR9271.
If you are not sure of the adapter’s name, just remove it, and you will notice the name that will disappear from the VirtualBox USB list.
-
Your wireless adapter will be listed under the “USB Device Filters” section.
-
(OPTIONAL - not sure what this does) “To finalize everything, right-click on your newly added USB filter and select the Edit Filters option.
A window will open listing all the details about your wireless adapter. Then, on the Remote option, click on the dropdown and select Yes.”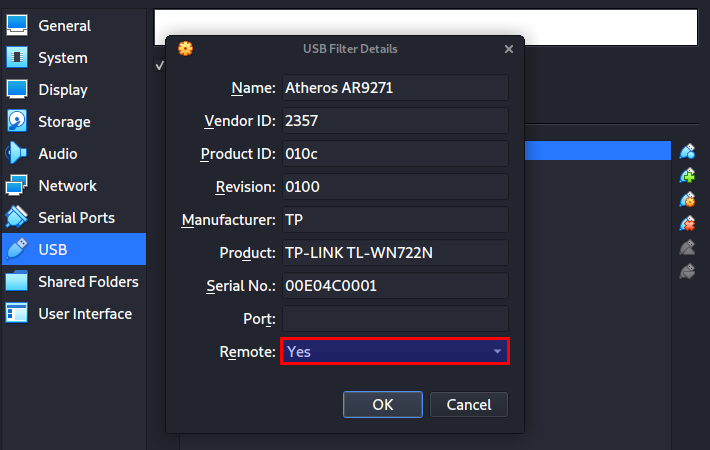
-
Click Ok to save your configurations.
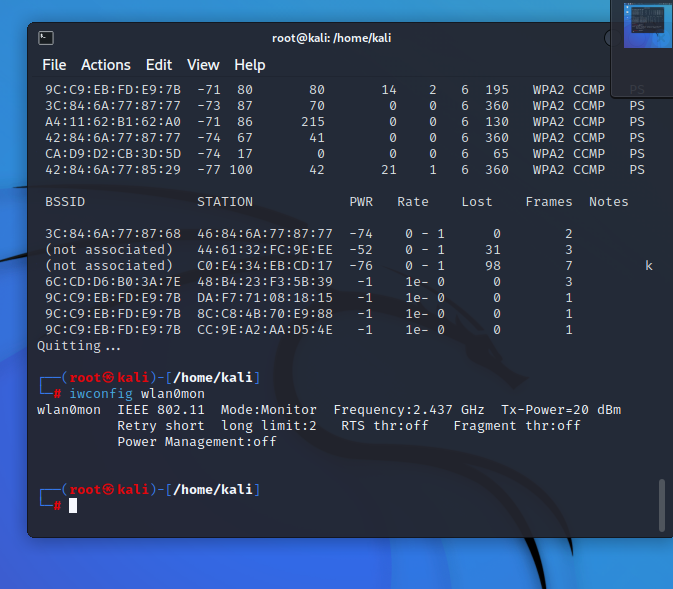
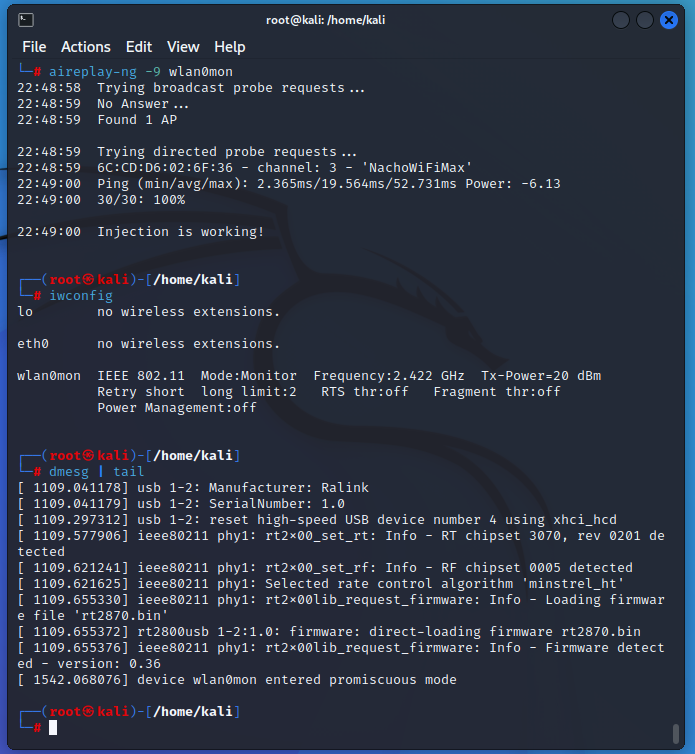
💉Testing Injection
Run:
sudo su
airmon-ng start wlan0
aireplay-ng -9 mon0
More:
📶Wi-Fi Adapters and Chipsets I’ve tried out
System Information:
- Windows 10
- 10.0.19044 Build 19044
- System Model
- HP Spectre x360 Convertible 13-ae0xx
- System Type
- x64-based PC
- Processor
- Intel(R) Core(TM) i7-8550U CPU @1.80 GHz
Virtualization Info:
- VirtualBox 6.1.38 r153438 (Qt5.6.2)
- Settings:
- Base Memory - 6000 MB
- 2 CPUs
- Network - NAT
- USB - tried USB 2.0 (OHCI + EHCI) & USB 3.0 (xHCI)
4 adapters that I've tested as of 9/4/2022.
- ALFA AWUS1900 (RealTek RTL8814AU)
- Panda PAU05 (Ralink RT5572)
- Panda PAU06 (Ralink RT5372)
- ALFA AWUS036NH (Atheros AR 9271)

4 adapters I’ve tested out. These are them on my desk.
AWUS 1900 (technically an unsupported chipset - RealTek RTL8814AU)
-
Caveats
- Driver sucks for windows. Better in MAC.
- Needs USB 2.0 or 3.0 it seems
-
Downloaded the driver
-
Connected to VirtualBox in the USB settings
-
No showing up easily on the list of devices
-
Ran lsusb
- the wifi adapter is being detected, but it needs a driver
-
Ran more commands and tried to download the driver in Kali Linux
-
Went here
-
-
https://cinetruth.com/how-to-install-alfa-wifi-adapter-driver-realtek-rtl88xxau-on-kali-linux-2022/
-
Video on youtube
-
video months ago
How to install Alfa AWUS1900 RTL8814AU drivers on Kali Linux 2022 2 & enable monitor mode
-
COMMANDS RAN:
- lsusb
- sudo apt update && sudo apt upgrade
- apt install realtek-rtl88xxau-dkms
- sudo reboot
- sudo apt install -y linux-headers-$(uname -r) build-essential dkms git libelf-dev
- mkdir -p ~/src
- cd ~/src
- git clone https://github.com/morrownr/8814au.git
- cd ~/src/8814u
- ./install_driver.sh
- wifite —kill
Panda PAU05 (Ralink RT5372)
- Message on http://www.pandawireless.com/Drivers | Panda Wireless.html about their drivers and adapters
- Windows 10 update: All Panda adapters are plug and play for Windows 10 and you don't need to install any driver for Panda adapters if your computer is running Windows 10. Please send an email to support@pandawireless.com if you have any question.
- Made sure it was attached in the VBox USB settings
- Not showing up with
iwconfigcommand - Turned it on in the “Devices” tab
- Showed up with
iwconfig - Worked with
airodump
Panda PAU06 (Ralink RT5372)
- Message on http://www.pandawireless.com/Drivers | Panda Wireless.html about their drivers and adapters
- Windows 10 update: All Panda adapters are plug and play for Windows 10 and you don't need to install any driver for Panda adapters if your computer is running Windows 10. Please send an email to support@pandawireless.com if you have any question.
- Didn’t work with injection for some reason
- NEEDS MORE TESTING
ALFA AWUS036NH (Atheros AR 9271)
- Didn’t work with injection for some reason
- NEEDS MORE TESTING
- “Workaround”:
- If I have it on NAT mode and I keep unplugging the device and plugging it back in without having to
airmon-ng start, then it will sometimes start working
- If I have it on NAT mode and I keep unplugging the device and plugging it back in without having to
-
Troubleshooting / FAQ / Common Issues
Other Methods of Running Kali Linux
Will have to go over some of these in another post - containzerized solutions, native, dual-boot, cloud-hosted options, etc.
Problems with USB devices
The USB section in a virtual machine's Settings window enables you to configure Oracle VM VirtualBox's sophisticated USB support.
Oracle VM VirtualBox can enable virtual machines to access the USB devices on your host directly. To achieve this, Oracle VM VirtualBox presents the guest OS with a virtual USB controller. As soon as the guest system starts using a USB device, it will appear as unavailable on the host.
Note:
- Be careful with USB devices that are currently in use on the host. For example, if you allow your guest to connect to your USB hard disk that is currently mounted on the host, when the guest is activated, it will be disconnected from the host without a proper shutdown. This may cause data loss.
- Oracle Solaris hosts have a few known limitations regarding USB support. See Chapter 14, Known Limitations.
In addition to allowing a guest access to your local USB devices, Oracle VM VirtualBox even enables your guests to connect to remote USB devices by use of the VirtualBox Remote Desktop Extension (VRDE). See Section 7.1.4, “Remote USB”.
To enable USB for a VM, select the Enable USB Controller check box. The following settings are available:
-
USB Controller: Selects a controller with the specified level of USB support, as follows:
- OHCI for USB 1.1
- EHCI for USB 2.0. This also enables OHCI.
- xHCI for USB 3.0. This supports all USB speeds.
Note
The xHCI and EHCI controllers are shipped as an Oracle VM VirtualBox extension package, which must be installed separately. See Section 1.5, “Installing Oracle VM VirtualBox and Extension Packs”.
-
USB Device Filters: When USB support is enabled for a VM, you can determine in detail which devices will be automatically attached to the guest. For this, you can create filters by specifying certain properties of the USB device. USB devices with a matching filter will be automatically passed to the guest once they are attached to the host. USB devices without a matching filter can be passed manually to the guest, for example by using the Devices, USB menu.
Clicking on the + button to the right of the USB Device Filters window creates a new filter. You can give the filter a name, for later reference, and specify the filter criteria. The more criteria you specify, the more precisely devices will be selected. For instance, if you specify only a vendor ID of 046d, all devices produced by Logitech will be available to the guest. If you fill in all fields, on the other hand, the filter will only apply to a particular device model from a particular vendor, and not even to other devices of the same type with a different revision and serial number.
In detail, the following criteria are available:
-
Vendor and Product ID. With USB, each vendor of USB products carries an identification number that is unique world-wide, called the vendor ID. Similarly, each line of products is assigned a product ID number. Both numbers are commonly written in hexadecimal, and a colon separates the vendor from the product ID. For example,
046d:c016stands for Logitech as a vendor, and the M-UV69a Optical Wheel Mouse product.Alternatively, you can also specify Manufacturer and Product by name.
To list all the USB devices that are connected to your host machine with their respective vendor IDs and product IDs, use the following command:
VBoxManage list usbhostOn Windows, you can also see all USB devices that are attached to your system in the Device Manager. On Linux, you can use the
lsusbcommand. -
Serial Number. While vendor ID and product ID are quite specific to identify USB devices, if you have two identical devices of the same brand and product line, you will also need their serial numbers to filter them out correctly.
-
Remote. This setting specifies whether the device will be local only, remote only, such as over VRDP, or either.
On a Windows host, you will need to unplug and reconnect a USB device to use it after creating a filter for it.
As an example, you could create a new USB filter and specify a vendor ID of 046d for Logitech, Inc, a manufacturer index of 1, and "not remote". Then any USB devices on the host system produced by Logitech, Inc with a manufacturer index of 1 will be visible to the guest system.
Several filters can select a single device. For example, a filter which selects all Logitech devices, and one which selects a particular webcam.
You can deactivate filters without deleting them by deselecting the check box next to the filter name.
-
Implementation Notes for Windows and Linux Hosts
On Windows hosts, a kernel mode device driver provides USB proxy support. It implements both a USB monitor, which enables Oracle VM VirtualBox to capture devices when they are plugged in, and a USB device driver to claim USB devices for a particular virtual machine. System reboots are not necessary after installing the driver. Also, you do not need to replug devices for Oracle VM VirtualBox to claim them.
On supported Linux hosts, Oracle VM VirtualBox accesses USB devices through special files in the file system. When Oracle VM VirtualBox is installed, these are made available to all users in the vboxusers system group. In order to be able to access USB from guest systems, make sure that you are a member of this group.
Make sure your USB device is selected in the devices tab
Get a detailed view of your USB devices
On Windows, you can also see all USB devices that are attached to your system in the Device Manager. On Linux, you can use the lsusb command.
IF YOU NEED EVEN MORE DATA AND STUFF USE THIS.
USBView in Windows - Windows drivers
Unplug it & Plug it Back In
This can sometimes activate code or checks that fix things. Might aswell try it.
Voltage Problem with USB port
For Kali Linux, Run lsusb -v |grep 'Bus\|MaxPower’ to get the Maximum power output for each port.
A solution on 🪟Windows which doesn't require additional software is the Device Manager itself:
- Go to Device Manager (
devmgmt.msc) - Click View > Devices by connection.
- Click on your Machine Name, hit the to expand everything.
- Look through the properties of the different USB Hubs, you can see what devices are connected.
- On the power tab, you get to see the power a device is consuming and what is being offered.
Forgot to enable your USB hub too?
Go into your USB settings for VirtualBox and make sure to enable your hub too
Troubleshooting Wireless Drivers
Troubleshooting wireless driver issues in Linux can be a frustrating experience if you don’t know what to look for. This article is meant to be used as a general guideline to better help you find the information you need to solve your wireless issues. The most thorough source for wireless driver information is the aircrack-ng documentation.
90% of wireless issues reported to us are due to people not reading the Aircrack-ng documentation. You need to run airmon-ng check kill before putting your card in monitor mode.
Carefully read carefully ANY error message as they will VERY OFTEN tell you what’s wrong and how to fix it. If not, then use your Google-Fu.
1. No Interface
(https://www.kali.org/docs/troubleshooting/troubleshooting-wireless-driver-issues/#1-no-interface)
- Stupid question: Is it a wireless card? (We’ve seen that several times)
- Is the device plugged in?
- Does it show up on lsusb or lspci (with the exception of phones)? You might want to update pci ids and usb ids
- Does dmesg contain any information about the driver loading and/or failing
- Is Kali a VM? Then, unless your card is USB, it will not be useable (VMware/VirtualBox/QEMU will virtualize EVERY PCI device). Is it attached to the VM?
- If there is nothing in dmesg and it’s not in a VM, then you might want to try the latest compat-wireless (and sometimes, you’ll need firmware) -> check on Linux-Wireless drivers
2. Interface But Can’t Do Anything
- Read error messages
- If there are no error messages, then run dmesg | tail and it will most likely tell you what’s wrong
- Firmware might be missing
- Check rfkill and any hardware switches and BIOS options
3. No Monitor Mode
(https://www.kali.org/docs/troubleshooting/troubleshooting-wireless-driver-issues/#3-no-monitor-mode)
- STA drivers (Ralink, Broadcom) and every other manufacturer’s provided driver doesn’t support monitor mode
- ndiswrapper doesn’t support monitor mode AND NEVER WILL.
- Airodump-ng/Wireshark don’t show any packets: check rfkill and any hardware switches and BIOS options
4. No Injection
(https://www.kali.org/docs/troubleshooting/troubleshooting-wireless-driver-issues/#4-injection)
- Test with aireplay-ng -9 (Make sure the card is in monitor mode with airmon-ng)
- Airmon-ng doesn’t display chipset information: It’s not a big issue as it just didn’t get that information from the card and doesn’t change the abilities of your card
- No injection but monitor mode: Check rfkill and any hardware switches and BIOS options
- Network managers sometimes interfere with Aircrack tools. run airmon-ng check kill to kill these processes.
Additional Links
(https://www.kali.org/docs/troubleshooting/troubleshooting-wireless-driver-issues/#additional-links)
Didn’t enable Wi-Fi in Kali Linux?
To enable the WiFi, type the following command to put the adapter back up.
$ sudo ifconfig wlan0 up
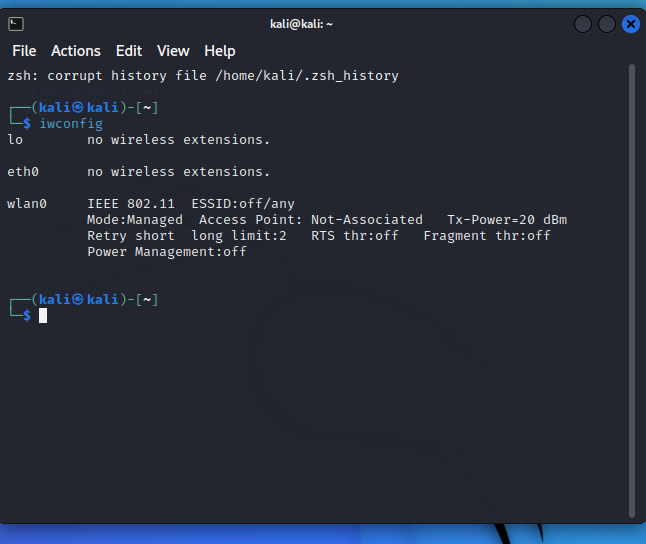
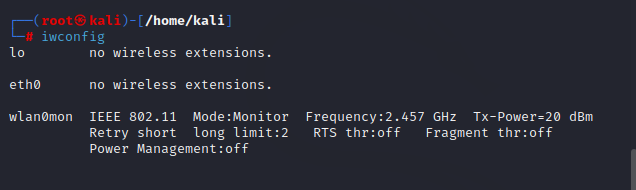
You can run iwconfig to make sure that it is up.
Have You Tried Turning It Off And On Again? 😅
It might work…you never know till you try.
My Workaround for my Issues (as of 9/2/2022)
Unplug and plug back in when I’m in Kali Linux and nothing is working. This tends to make things start to work. Still can’t tell if this is an issue with USB power draw, VBox, etc.
Conditions for working
- Steps:
- Open Kali
- iwconfig
- airmon-ng start wlan0
- iwconfig
- airodump-ng -c6 wlan0mon
- Doesn’t work
- Unplug and Replug Device
- airmon-ng start wlan0
- airodump-ng -c6 wlan0mon
- aireplay-ng -9 wlan0mon
Conditions for not working
- Steps:
-
iwconfig
-
aireplay-ng -9 wlan0mon

-
iwconfig
-
What is wrong???
-
Commands I’ve tried to get info and troubleshoot
lspci -k | more lspci | less lspci | grep -i intel lspci | grep -i broadcom lspci | grep -i wireless airmon-ng check kill rfkill unblock all rfkill airmon-ng dmesg- PROBLEMS:
-
I don’t even see any network or wifi thing in the lspci command
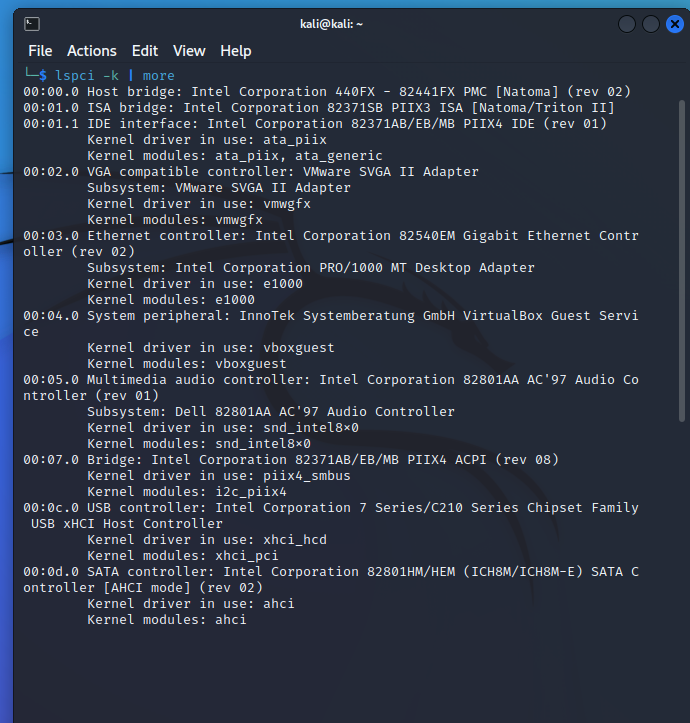
-
MAYBE that is what the host controller is though. YEAHHH. It is….so I’m still stuck here.
-
- PROBLEMS:
-
It randomly worked?
-
WHY?
-
-
Random articles
-
OTHER THINGS I’ve tried
- rfkill unblock all
- Changing USB type
- 1.1
- 2.0
- 3.0
- The correct order
- airmon-ng check kill
- airmon-ng start wlan0
- aireplay-ng -9 wlan0mon
- command line ifconfig down → up
- ifconfig wlan0 down
- ifconfig wlan0 up
- downloading the driver
- Checked voltage
- don’t know how to check if this is working correctly
- Plugged the wifi adapter into multiple usb ports