

TL;DR - Not everyone can afford an expensive Tableau write block kit, but anyone can afford a USB and likely have a computer that can run a VM. A bootable Kali Linux instance in forensics mode is the perfect software-based alternative to a hardware write blocker, and you can bring it with you anywhere. To do so, we just get the free bootable Kali Linux VM from Kali, "etch" it to a USB drive, then open it in forensics mode (blocks tampering of evidence) with persistence (can save our progress).
Introduction
In digital forensics, ensuring the integrity of digital evidence is crucial to its admissibility in court. Experts should use well-known methods that minimize the risk of tampering with the data. After acquiring or imaging digital evidence, analysts need to analyze it without making any changes to the original data. Any modifications to the data can render it inadmissible in court.
However, several factors can accidentally or intentionally tamper with digital evidence, including accidental deletion or modification, applications or programs that can overwrite the data (including malware), altering metadata of the image file, and network connectivity issues. To avoid such incidents, it's essential to use forensic tools and procedures that prevent data tampering, such as write-blockers, read-only modes, and forensic modes of operating systems. These measures help prevent accidental or intentional modifications to the data, ensuring its authenticity and admissibility in court.
There are lots of ways in which evidence can become inadmissible😖:
- Chain of custody issues, such as the inability to prove that the digital evidence was not tampered with or altered.
- Data integrity issues, such as the inability to prove that the digital evidence was not modified or corrupted during the investigation.
- Admissibility challenges from opposing counsel, who may argue that the digital evidence is unreliable due to the lack of proper forensic procedures.
- Expert witness testimony challenges, as experts may not be able to testify with certainty about the authenticity and integrity of the digital evidence without proper forensic procedures and tools.
- Challenges based on legal and ethical requirements, such as the inability to comply with relevant laws, regulations, and standards governing digital forensics, such as the Federal Rules of Evidence and the Daubert standard.
The Machine Reference Model, Dual-Mode Operation, Interrupt Handlers - how it relates to write blockers and bootable Kali
Some links to learn:
- Virtualization | A Machine Reference Model - GeeksforGeeks
- Dual Mode operations in OS - GeeksforGeeks
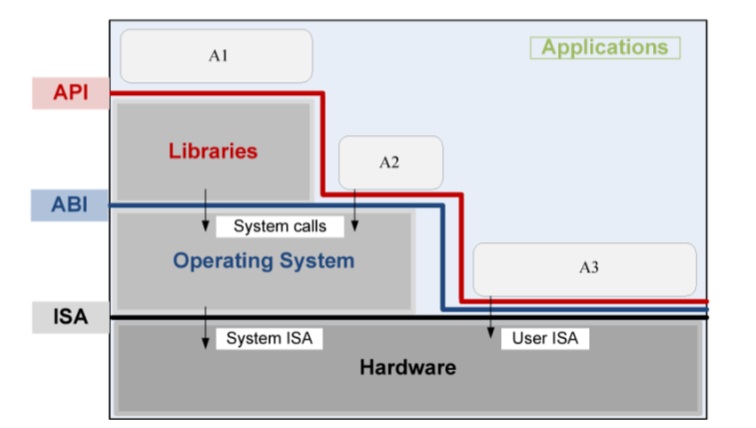
The Machine Reference Model is a conceptual model that provides a framework for understanding the functional components of a computer system, from the hardware layer to the application layer. In digital forensics, this model is essential for analyzing digital evidence while maintaining its integrity. Dual-mode operation is another crucial concept in digital forensics that separates user-level processes and kernel-level processes to ensure the security and integrity of digital evidence.
The Layers Explained
At the bottom layer, you have the hardware, which is made up of physical parts like the keyboard, mouse, and screen. These parts need to be able to talk to each other, and they do this using a language called the Instruction Set Architecture (ISA).
ISAs are important because they provide a standard way for software developers to write programs that will work on different processors. By writing programs that use the instructions defined in a particular ISA, developers can create software that will run on any processor that supports that ISA. Both ARM and x86 processors have their own ISAs, which means that programs written for one ISA won't necessarily work on the other. When software is compiled, it is converted into machine code that is specific to the processor's ISA, either ARM or x86.
On top of the hardware layer, you have the operating system, which is like the "boss" of the computer. The operating system helps manage things like the programs you run on your computer, the files you save, and the internet connections you make.
The operating system talks to the hardware using the ISA, but it also needs to be able to talk to the programs and apps that you use. This is where the Application Binary Interface (ABI) and Application Programming Interface (API) come in.
The ABI is like a set of rules that different programs use to talk to each other and share information. The API is like a list of commands that different programs can use to ask the operating system to do things for them.
Finally, at the top layer, you have the programs and apps that you use every day. These programs talk to each other and to the operating system using the APIs, which allow them to share information and work together.
So, in summary, the different layers of a computer system need to be able to talk to each other, and they do this using interfaces like the ISA, ABI, and API. These interfaces allow the different parts of the computer to work together and make it possible for you to use your computer in the way that you do.
How apps interact with hardware despite not having permission
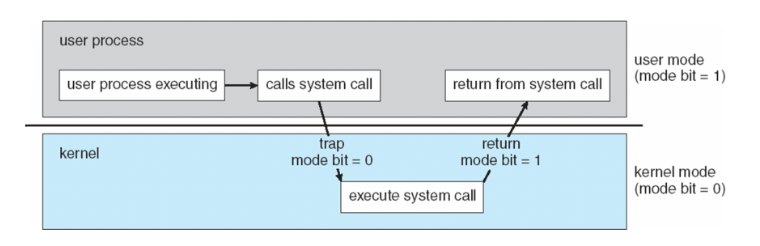
System calls are sent into kernel mode through a software interrupt. When a user-level program makes a system call, it executes a special software interrupt instruction, which transfers control from user mode to kernel mode. The interrupt is typically handled by an interrupt handler that is part of the operating system, which executes the requested system call on behalf of the user-level program.
In more detail, when a user-level program makes a system call, it places the arguments of the call into designated registers or onto the stack. It then executes the software interrupt instruction, which generates a trap or interrupt to transfer control to the operating system. The interrupt handler then executes the necessary code to perform the requested system call, which may involve accessing system resources or hardware devices that are not available in user mode.
Once the system call has been executed, the interrupt handler returns control to the user-level program, which continues execution in user mode. The system call may return a result or an error code to the user-level program, which can then continue its operation based on the result of the system call.
System calls are an essential component of operating systems and provide a way for user-level programs to access system resources and perform privileged operations, such as disk access or network communication. The use of software interrupts to transfer control from user mode to kernel mode ensures that the operating system remains secure and stable, preventing user-level programs from accessing sensitive system resources or modifying critical system functions.
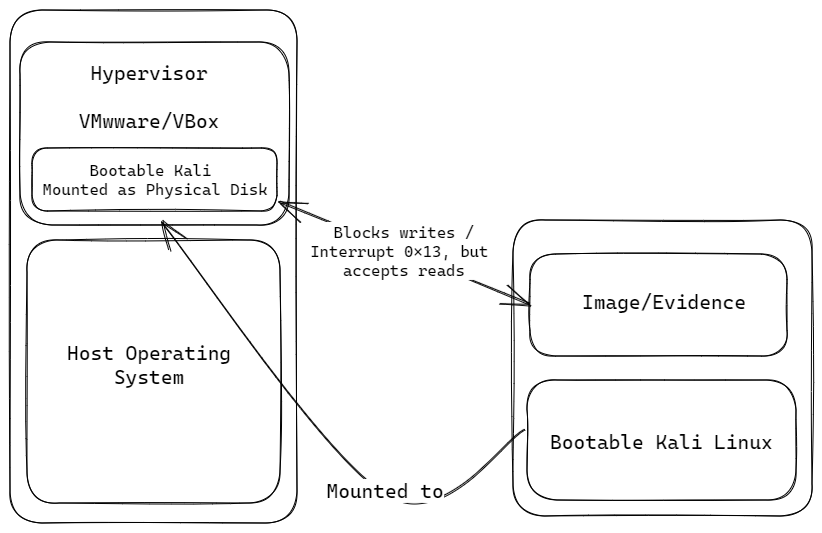
In practice, these concepts are applied in write blockers and bootable Kali Linux. Write blockers use interrupt handlers to block write operations to storage devices, preventing any unauthorized modifications to digital evidence. Bootable Kali Linux has a forensics mode that separates user-level processes and kernel-level processes to ensure that digital evidence isn't altered during the analysis process. The operating system is booted into a read-only environment, preventing write operations to storage devices.
Interrupt handlers are a critical component of the operating system layer, responsible for managing hardware interrupts and providing a way for the kernel to respond to events while maintaining the security and integrity of digital evidence. In digital forensics, interrupt handlers are used in conjunction with write-blocking tools to prevent unauthorized modifications to digital evidence.
The Machine Reference Model, dual-mode operation, and interrupt handlers are essential components of digital forensics, providing a high level of security and accuracy in the analysis and preservation of digital evidence. By using these concepts, digital forensics professionals can ensure that the integrity of digital evidence is preserved and that it is admissible in a court of law. Write blockers and bootable Kali Linux are just two examples of how these concepts can be applied in practice to achieve this goal.
"Interrupt 0x13" - how write blockers work? 👻
In the context of computer architecture and digital forensics, interrupt 13 (0x13) is a hardware interrupt that is generated when a program requests disk access through BIOS. BIOS (Basic Input/Output System) is a firmware interface that provides low-level hardware access to the computer system, including the disk subsystem.
When a program requests disk access through BIOS, interrupt 13 is triggered, and the BIOS Disk Services interrupt handler intercepts the request. The interrupt handler then performs the necessary disk operations, such as reading or writing data, and returns the result to the calling program.
Interrupt 13 is an example of how hardware interrupts can be used in digital forensics to maintain the integrity of digital evidence. By intercepting disk access requests and blocking unauthorized modifications, interrupt 13 can help ensure that digital evidence remains admissible in a court of law.
I'm pretty sure this means you can make your own write blocker using the BIOS 0x13 flag.
Misc Resources:
Installing Bootable Kali to USB Drive
Kali Documentation
I’m following the resource from the Official Kali website - Making a Kali Bootable USB Drive on Windows | Kali Linux Documentation.
Etcher
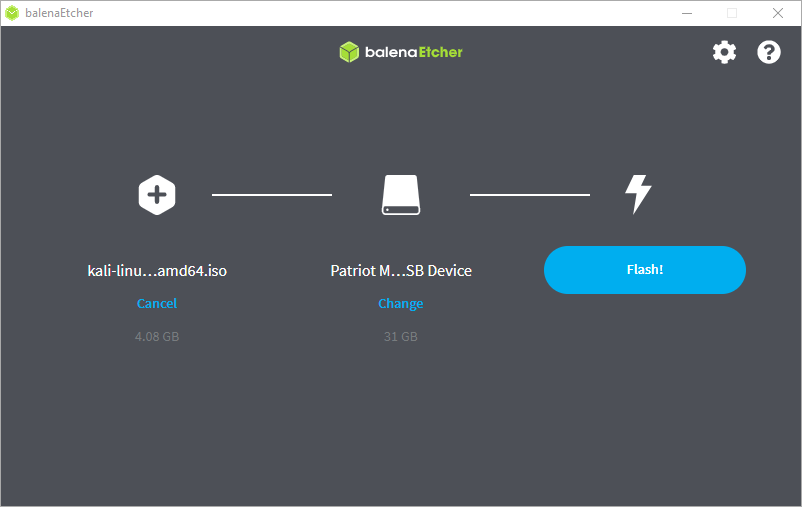
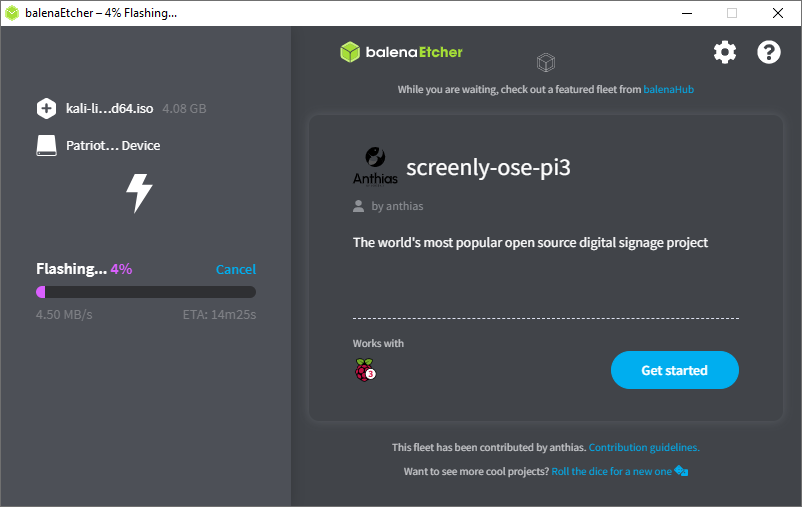
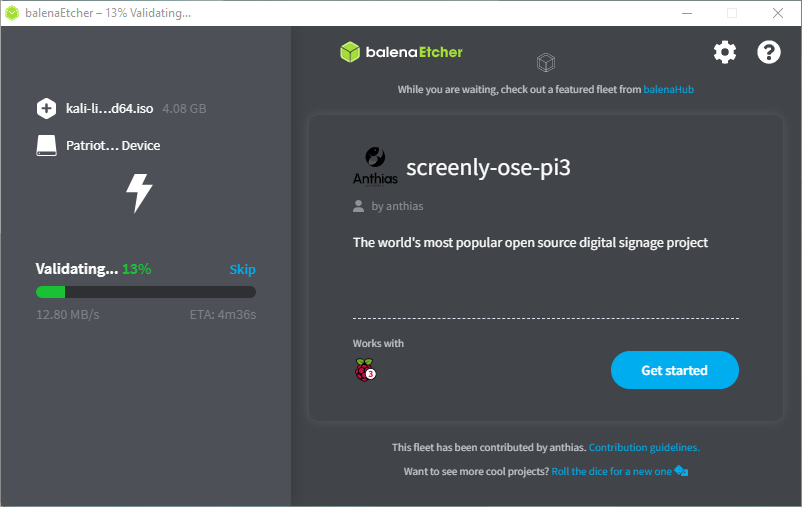
In the documentation, they recommend using “Etcher” (balenaEtcher - Flash OS images to SD cards & USB drives) to do the imaging, so I’m going to try it out. Etcher says that it can “Flash OS images to SD cards & USB drives, safely and easily.” It also does validation to make sure drives aren’t corrupted which would definitely save time if you haven’t troubleshooted complex storage or imaging problems before. The interface is really simple too. I disagree with the notion that everything has to be CLI. I’m going to do what is easy, because that is what it means to be good at IT - innovate, simplify, then optimize. There is no need to overengineer the process.
Using Etcher with kali-linux-2022.4-live-amd64.iso
I obtained this image from the “Live Boot” section of the https://www.kali.org/get-kali/ page.
-
Setup
- Really simple. Made sure I selected the correct USB flash drive and the ISO file I downloaded.
-
Running
-
Validating
-
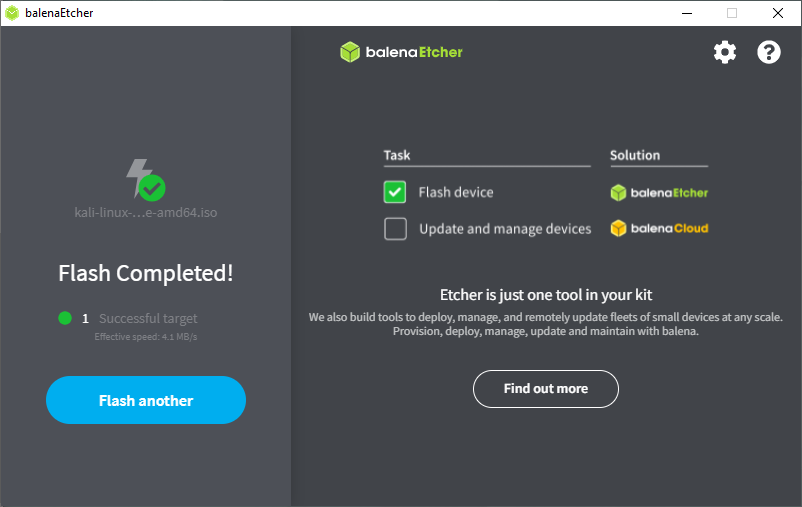
Finished
Running a Kali Linux Bootable USB in Forensics Mode
Getting a hypervisor - I tried both VMware and VirtualBox
I decided to use VMware because I’ve had more issues with VirtualBox in the past.
- Download VMware Workstation Player | VMware
- This is very easy. I could even use VirtualBox instead - Downloads – Oracle VM VirtualBox.
- Both work great, but I decided to take the road less traveled
The hard part seems to be actually booting the USB stick.
There are a few ways to live boot the USB stick on a Windows Host:
- Launching from VMware by selecting physical disk - How to use Bootable USB drive in VMware Player to install OS
- Launching from Windows Boot Menu - Booting from a USB drive
Setting Up a Hypervisor & Virtual Machines for USB Live Boot
Trying to Boot Live from Within UEFI Menu for a Windows VM
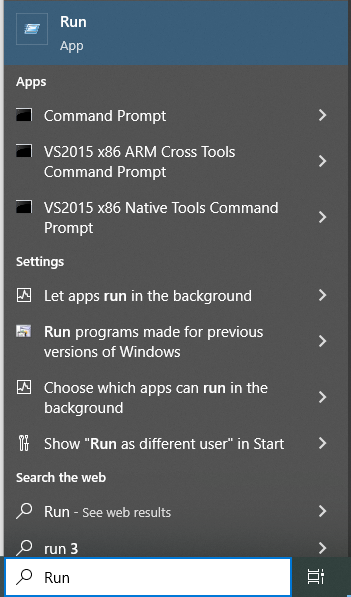
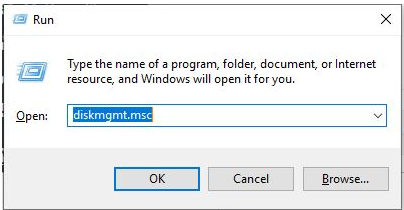
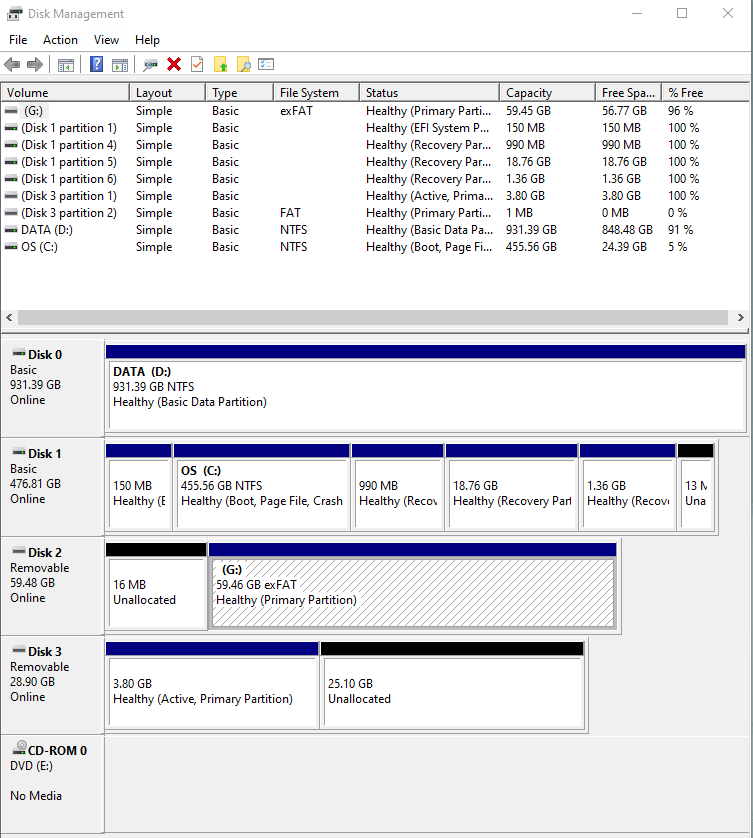
I needed to figure out what physical drive the USB was defined as in the OS, just in case I needed it to define what physical drive to use for booting.
I hit the Windows button, clicked the ‘Run’ program, then typed in
diskmgmt.msc, then ‘Enter.’
It was obvious that Disk 3 was my USB, and also that the 3.80 GB was the Live Kali data that I “etched” onto the USB…get it?😂 Now I had the information I needed for later.
Booting a Live USB in a Virtual Machine
There were ironically quite a few pretentious IT people online that questioned why someone would do such a thing. Like “bro just dual-boot with your host machine. 😡”
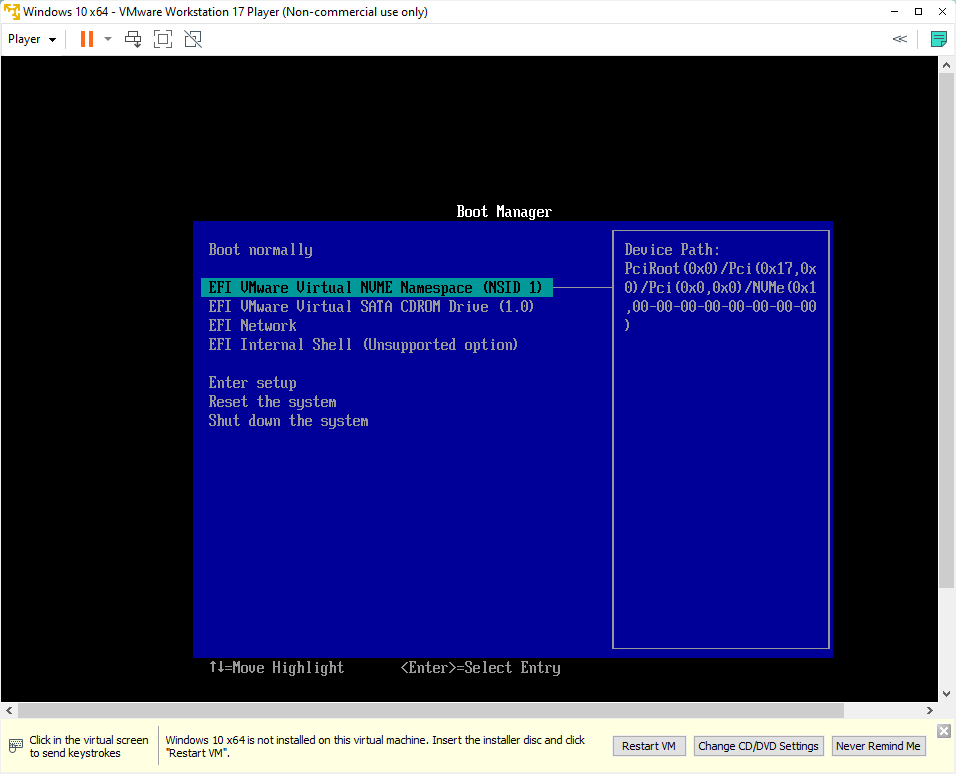
Trying to boot from BIOS in Windows VM - VMware?
I thought that if I could do it with my host computer, then why not with the VM. Don’t they work the same? 😅 Let’s try! 😆
I spammed the ‘F12’ button as the Windows VM loaded and it got me here.
I didn’t see any USB or related options on the menu, so I thought I would retry some things. I looked up the Internal Shell too, but that seemed way too inefficient and complicated to try.
I thought I would take a look at the tried and true program “Rufus”, to see what other info I could glean from the USB.
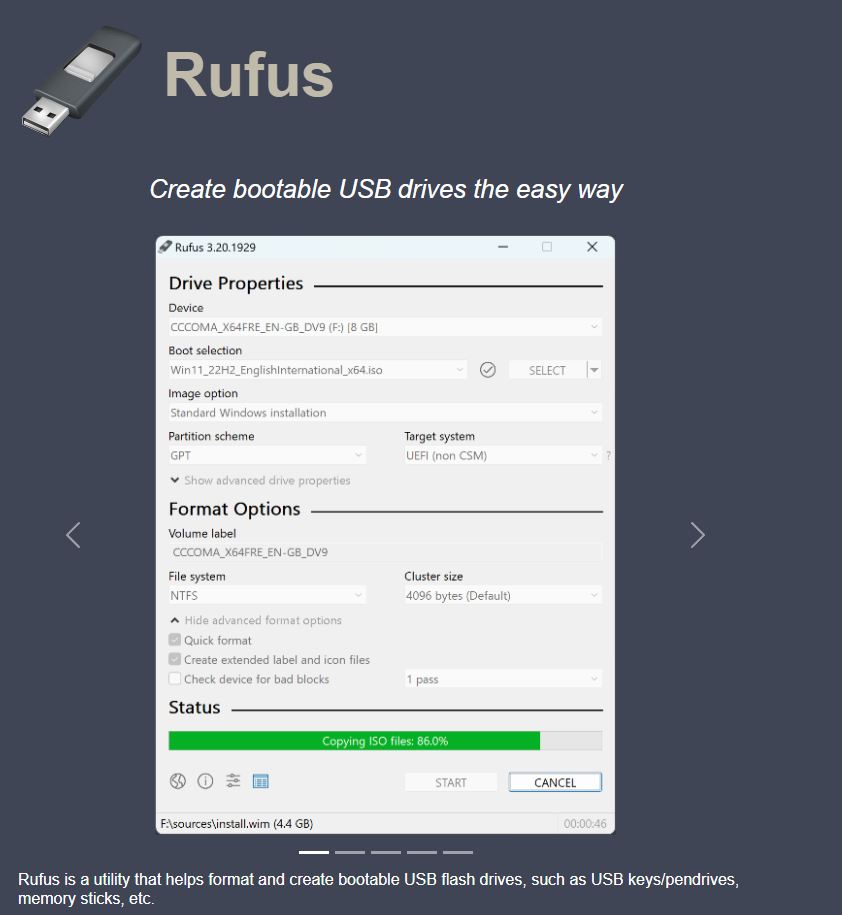
Rufus download page
Everything looked fine in Rufus too, so I don’t think it was the USB having issues or being in the wrong format with the partitioning.

I also tried to make sure that VMware had the device plugged in. The device hadn’t been plugged into the VM, so maybe this was the issue.
I tried to boot again by spamming the ‘F12’ key, and turns out, I hadn’t hit the key fast enough before. I arrived at this new screen, but alas there was no option for USB.
Booting Kali Linux from a USB in VMware
This is the method that finally works out of the 3 method methods I try. VMware has the option of booting from a physical disk, and this includes a USB drive. In this case, we already know that the physical disk is Physical Disk 3 .
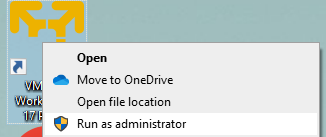
Made sure to start VMware Workstation Player as Administrator, or else we will have errors.
I created a new Windows 10 VM which was really easy to do.
I needed to now add a new Hard Disk to that VM. This would become a reference to the USB drive’s physical drive space.

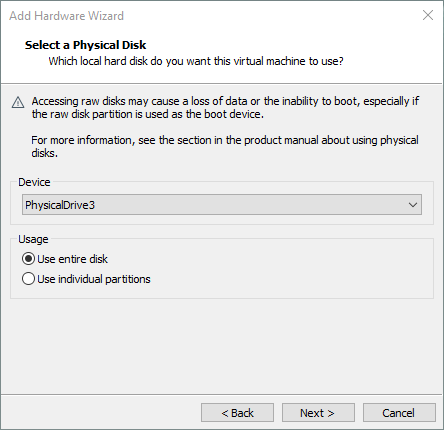
Next up, I selected “Use a physical disk” - for ADVANCED USERS 😏.

I select PhysicalDrive3 which I figured out was the USB in past steps.
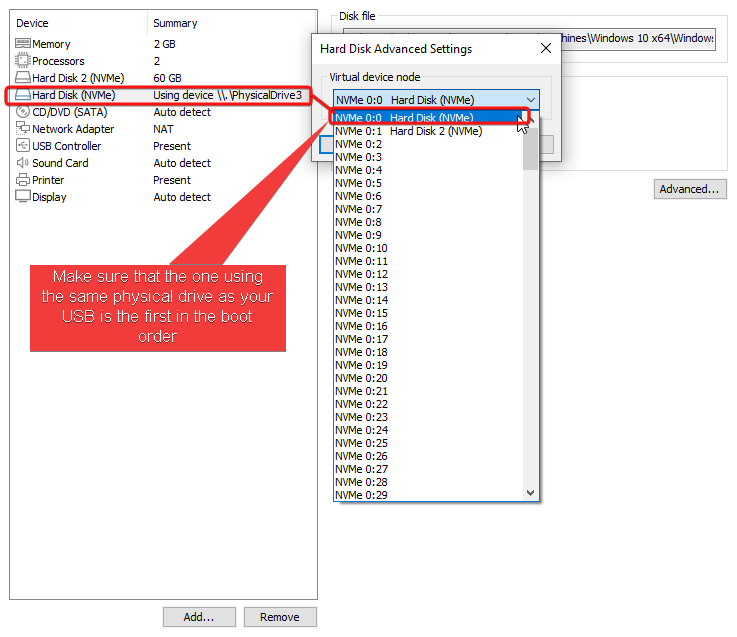
Turns out, “boot priority” is what matters here. We can tell the VM what to try using to boot up, and we can define a prioritized order. In this case, we want the USB drive to go first in that order.
To change the order, I click on each hard disk (one at a time), go into the advanced settings, and do a 3-step move to make them swap places, so that the USB one is on top.
Generally the steps go:
- Click on the regular hard disk → move to NVMe 0:2 or any other slot past that → Ok
- Click on the USB hard disk → move to NVMe 0:0 → Ok
- Click on the regular hard disk → move to NVMe 0:1 → Ok
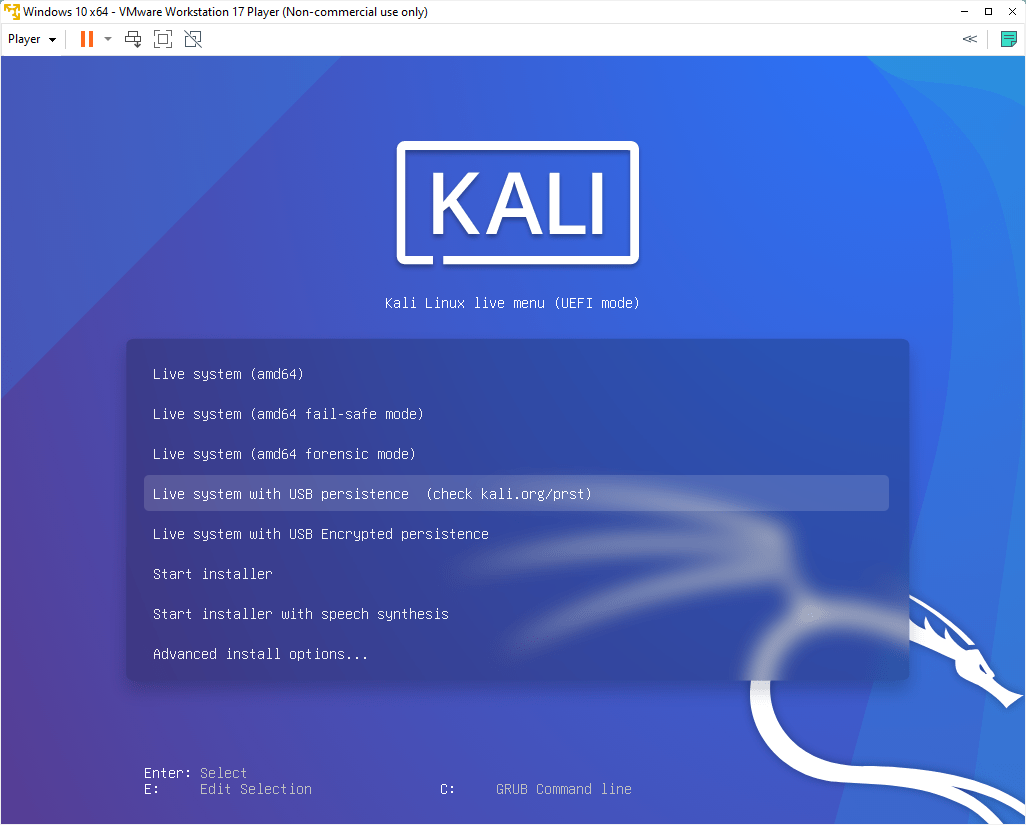
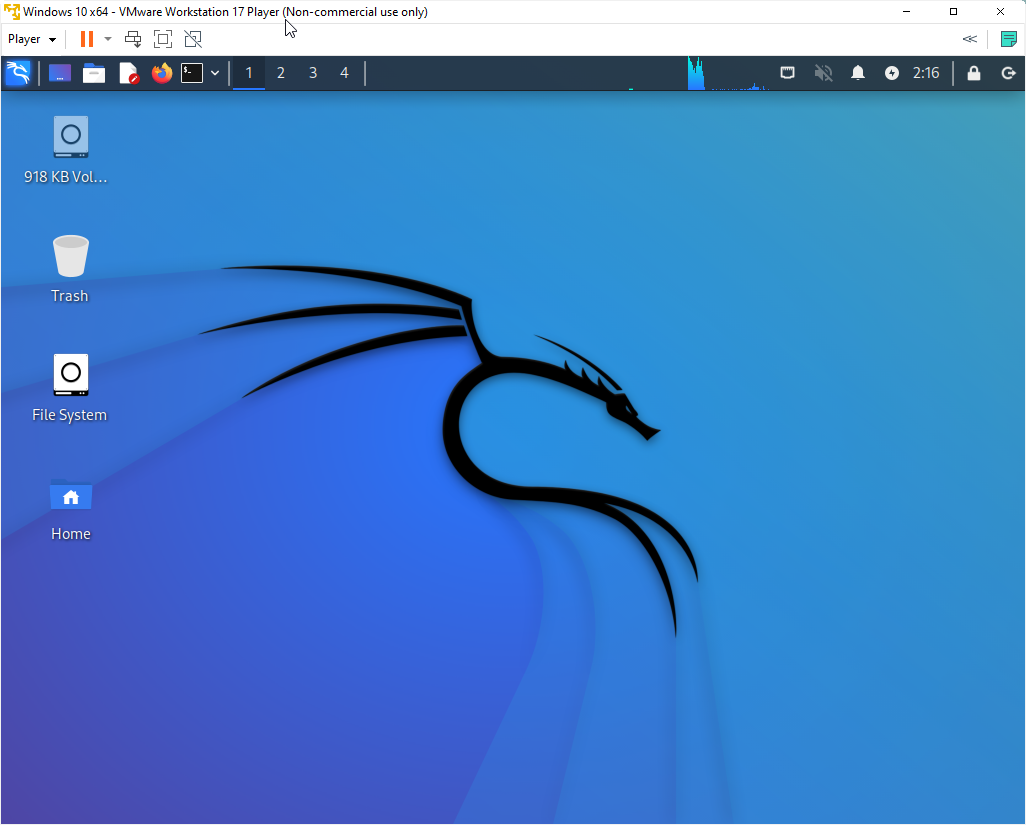
After starting up the VM, I arrive at the live USB-booted Kali Linux instance.
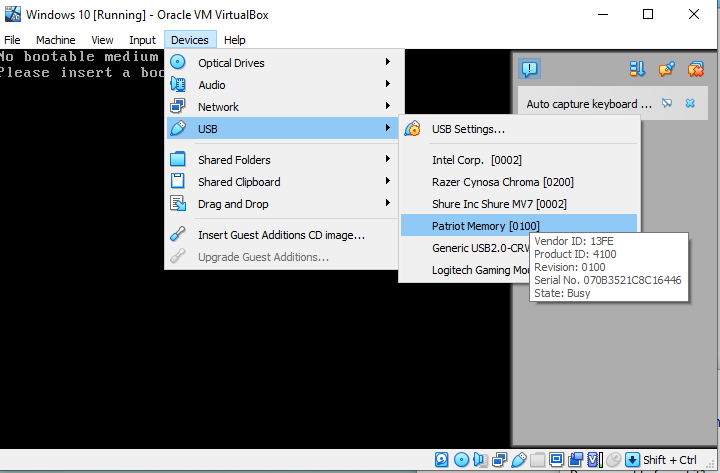
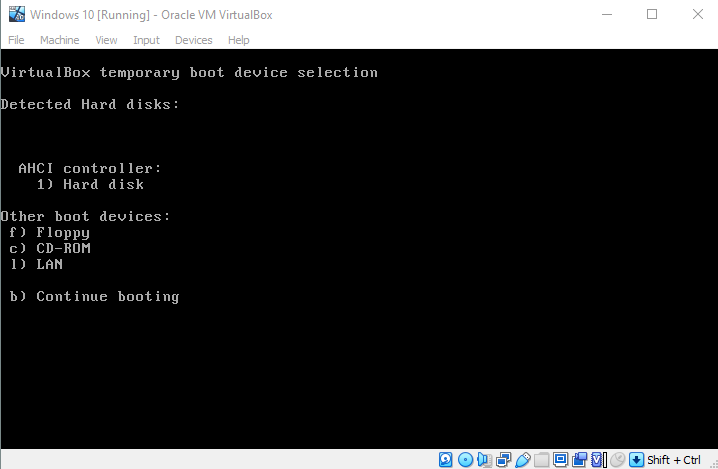
Booting Kali Linux from a USB in VirtualBox
Booting from VirtualBox is apparently possible. However, I don’t manage to get it working here. However, you essentially have to create a “medium” with createmedium . That medium is a reference to a hard disk (HardDisk3 in this case). Then we simply attach to that medium in VirtualBox.
One of the big changes this year with this was the related commands with VirtualBox:
VBoxManage internalcommands createrawvmdkwas deprecatedVBoxManage createmedium diskis the new command
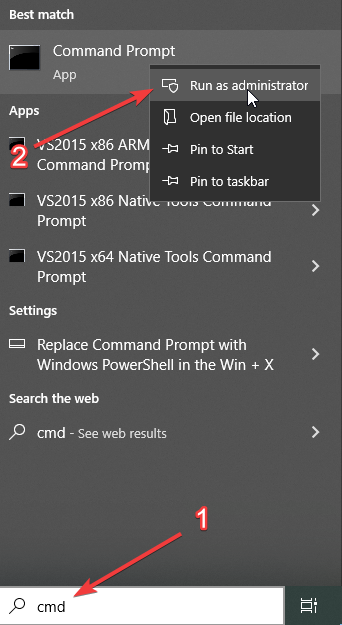
Run the command prompt, so you can do the VBoxManage createmedium disk .
DEPRECATED Commands that I tried to run:
VBoxManage internalcommands createrawvmdk -filename C:\usb2.vmdk -rawdisk \\.\PhysicalDrive#
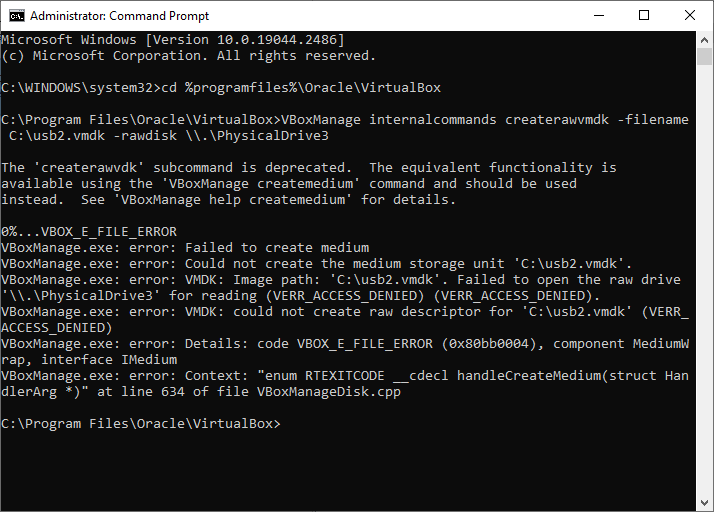
The 'createrawvdk' subcommand is deprecated. The equivalent functionality is available using the 'VBoxManage createmedium' command and should be used instead. See 'VBoxManage help createmedium' for details.
I found the related docs that showed the 'VBoxManage createmedium' command (https://www.virtualbox.org/manual/ch09.html#rawdisk)
It also showed a nice warning about running commands that create mediums for raw disks.

Commands:
cd %programfiles%\Oracle\VirtualBox
VBoxManage createmedium disk --filename C:\usb2.vmdk --format=VMDK --variant RawDisk --property RawDrive=//./PhysicalDrive3

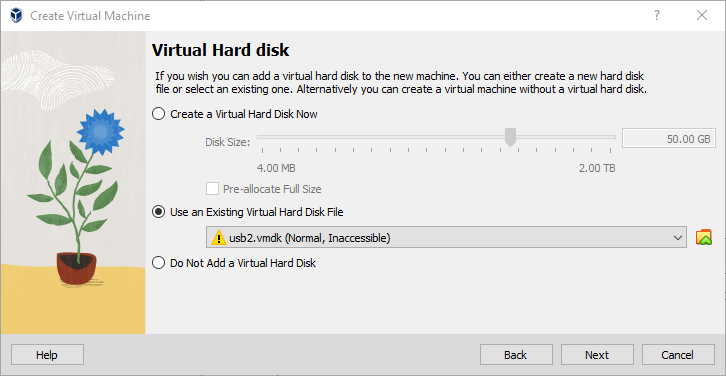
The commands worked and I created a .vmdk file (the only format you can use with the raw disk option for VBox). Now I just need to set this up with a VM.
Created a Windows 10 machine.
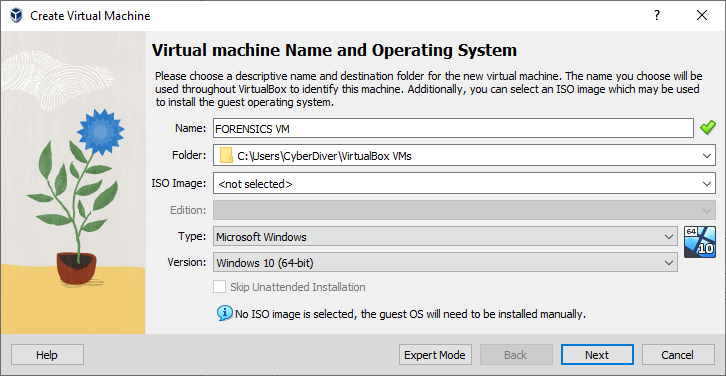
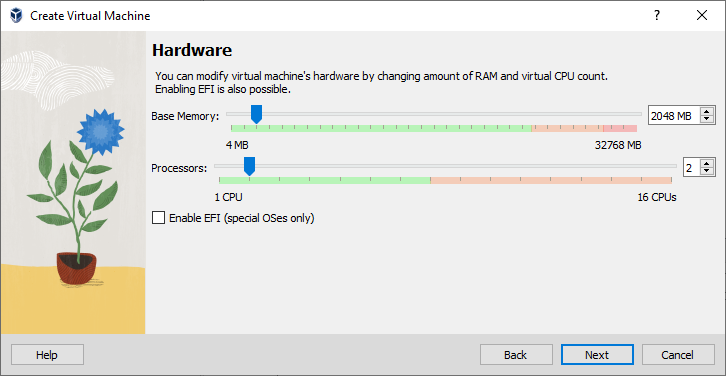
Added some simple RAM and CPU specs.
“Use an Existing Virtual Hard Disk File” (the .vmdk file that was created).
“Finish”
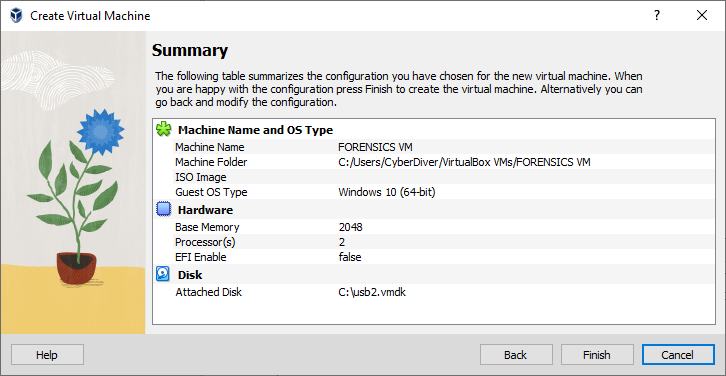
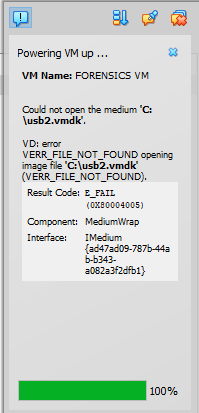
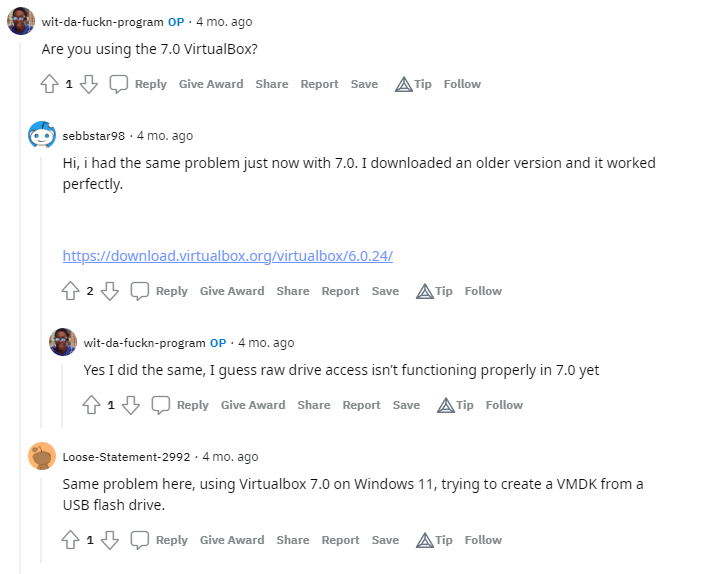
At this point, everything should work. The usual error people get is that they don’t “Run as Administrator” with VBox, but here I get VERR_FILE_NOT_FOUND . This is a completely unexpected error.
I looked at Reddit to see what other users were saying. ( (2) Help with creating VMDK file for raw drive access : virtualbox ). 4 months ago, users were saying that Workstation Player 7.0 doesn’t seem to function properly. This isn’t that reliable though.
I found an article online talking about ways to fix the error, but nothing seemed to apply to this case (Top 8 Methods to Fix VBOX_E_FILE_ERROR (0x80bb0004) [2021 Update]).
I even modified the past command by selecting a partition, but this didn’t fix the issue.
VBoxManage createmedium disk --filename C:\usb2.vmdk --format=VMDK --variant RawDisk --property RawDrive=//./PhysicalDrive3 --property Partitions=1

Installing Forensics Tools & Kali in Forensics Mode
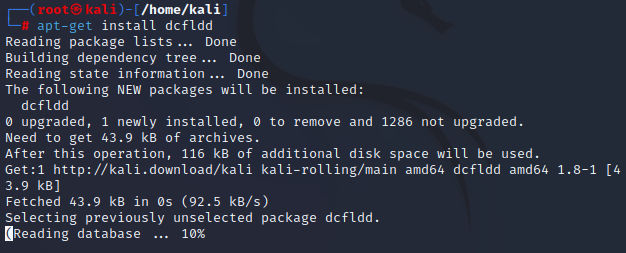
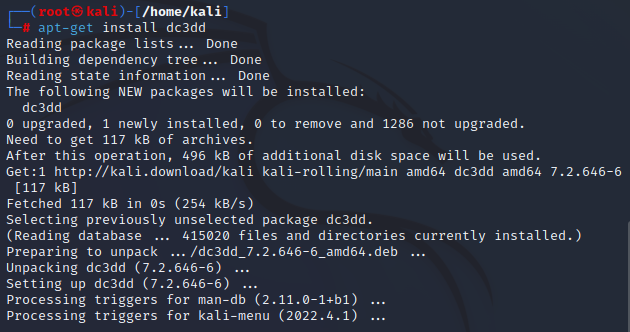
Here’s examples of a few tools that can be downloaded to start learning fundamental forensics workflows and processes.
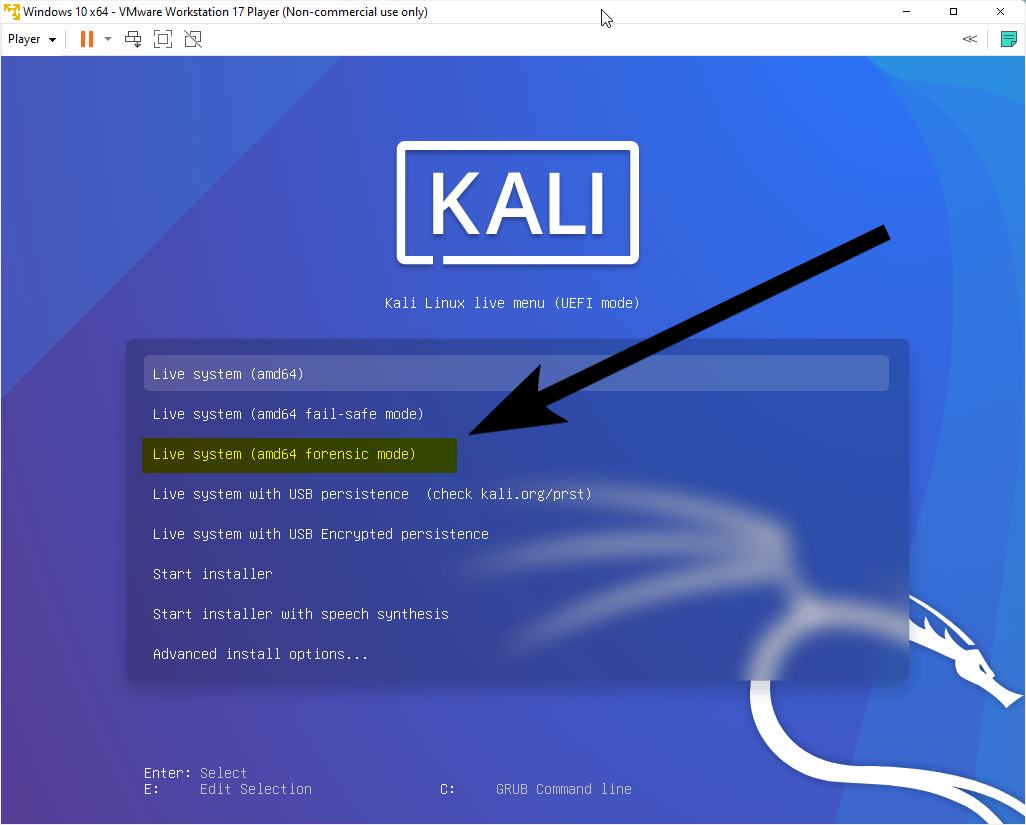
Start Kali in Forensic Mode
Installing Tools in Kali
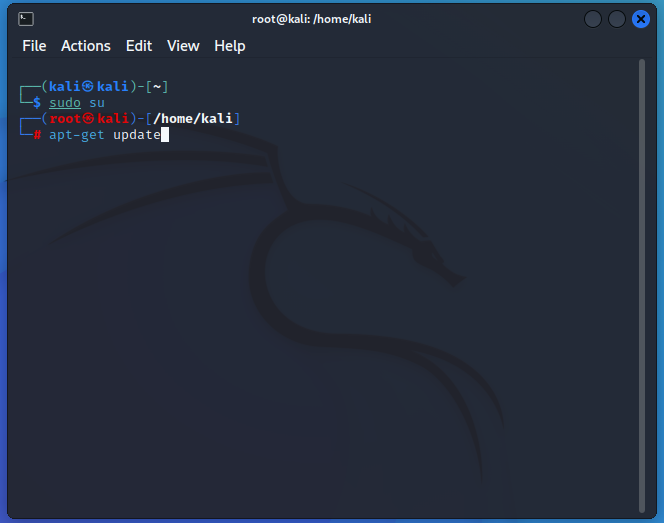
Generally every system and tool in Kali is installed through Advanced Packaging Tool (APT).
Open a terminal, run sudo su, then apt-get update. This will update the packages list for Kali so that you can have the most up-to-date tools when you install them with APT.
Data Acquisition Tools
Two Windows Tools

Other Resources
- Creating Bootable USB
- Downloads
- USB Booting in VMware
- USB Booting in VirtualBox (didn’t work for me)
- Chapter 8. VBoxManage
- Chapter 9. Advanced Topics - 9.7.1.2. Access to Individual Physical Hard Disk Partitions - VirtualBox Documentation
- How To Boot From USB Drives In VirtualBox - I Have A PC | I Have A PC
- (2) Help with creating VMDK file for raw drive access : virtualbox
- How to Boot from a USB Drive in VirtualBox in Windows? - PCInsider - outdated
- (38) How to boot From A USB Flash Drive in Virtualbox - YouTube - outdated
- Data Acquisition
- Misc